Friday 28 October 2011

Christmas Past .... By Gillian Simson


Using the inspiration from one of my favourite vintage Christmas Stamp Sets by Tim Holtz, I started out by covering this Wooden Door Sign in Distress Stain (Weathered Wood), then added a layer of stripes with Distress Stain (Picket Fence), once dry I then added a further layer of Distress Stain (Faded Jeans) then wiping over with a baby wipe to give a more soft/blended feel to the sign. I stamped the background text in Archival Ink (Manganese Blue), I then stamped the Father Christmas Image, the Snowflake Image and Merry Kiss-Mas quote designed by Jo Capper-Sandon for Stampotique in Distress Ink (Chipped Saphire). I then added Picket Fence Distress Stickles for a frosted/snowy look.

The current Happy Daze challenge is Christmas or Hallowe'en. You have until Midnight on 31st October when one winner will be drawn at random to win a £15 voucher and free P&P to spend in the Happy Daze shop. Maximum of 3 entries per person & you must use at least one product which can be purchased in the Happy Daze shop.
  • You can enter by blogging your address to the linky widget here,
  • emailing your picture to info@happy-daze.net
  • uploading your photo to their facebook page
Link

Thursday 27 October 2011

Air-mail delivery! by Ruth

When the postman delivered these 12x12 papers I knew I had finally found the answer to last years Christmas Eve photos.
I love the detail on these Pink Paislee papers from their
 Father Christmas collection.
This one is called Air-Mail and has a perfect vintage cosy feel and plenty of space for decorating and embellishing.


I sprayed the background with Meadow colour wash spray to dirty it up a bit, added a couple of layers of notelets and old book papers.

Alphabet stickers found in the Basic Grey sale, a blue ticket from the Parisian Anthology range and a shabby handmade muslin flower spritzed with a red and green colourwash, finished off with a couple of vintage buttons.


If you wanted to make a flower like this you could easily start with the ready made Mistable Flowers by Pink Paislee and fray the edges a little.

Don't forget this months challenge is either Halloween or Christmas something to suit everyone as the saying goes..x

Tuesday 25 October 2011

Hark The Herald Angels By Paula Tidman


Another christmas decoration from me, this time a hanging. I recycled some card and glued both sides with pale blue paper from my stash then cut out a large heart shape. I randomly stamped and embossed snowflakes and pine cones with white embossing powder, then tinted with versamagic dewdrop chalk inks in pixie dust, sea breeze and aegean blue. I stamped Lost Coast Designs Hark the Herald Angels in archival ink onto glossy paper and tinted with the same versamagic inks. I added some white guipure lace, bead trim and a few embellishments from my stash. I punched a hole each side and threaded through some seam binding to create the hanging.


The current Happy Daze challenge is Christmas or Hallowe'enYou have until Midnight on 31st October when one winner will be drawn at random to win a  £15 voucher and free P&P to spend in the Happy Daze shop. Maximum of 3 entries per person & you must use at least one product which can be purchased in the Happy Daze shop.
  • You can enter by blogging you address to the linky widget here
  • emailing your picture to info@happy-daze.net
  • uploading your photo to their facebook page


Sunday 23 October 2011

Christmas with non-Christmas stamps by Joanne Wardle


You don't always have to buy special Christmas stamps to make your Christmas cards. Sometimes you just have to look at the stamps you have in a different way. This general tree from Stampotique, can easily be made to look wintry with simple colouring, and the addition of white flower soft or glitter. The tiny bird from Jo Capper-Sandon's range can easily be made to look like a robin redbreast with the appropriate colouring


Friday 21 October 2011

Death bangle by Julie Dandy


Can't find the perfect jewellery to go with your halloween costume? or do you want something just a little bit different to everybody else's??

Then pick up some of these amazing wooden bangles from Moira at just £3.55 for a set of three!!! :D

They have a lovely smooth surface so are very easy to colour.
I coloured mine by rubbing on Viva decor inka gold and polishing it up.

I then stamped white tissue paper with images from these fabby Pink Paislee Phantom stamps .

I glued them on with Claudine Hellmuth matte medium being careful not to get any on the front of the image as I wanted to tint the images with distress Spiced Marmalade ink pad.

I lightly spritzed patches of the bangle with Cosmic shimmer mist - just a little warning though, the pigment is very strong in these and stains very easily.....I have very purple hands right now!!!

I glued on some little patches of grey lace with the matte medium then when dry smeared on some distress stickles in Spiced Marmalade and Chipped Sapphire.

When everything was dry I sponged on more matte medium to seal everything in place.

You could make bangles to match all your outfits with these very affordable bangles :D
Now for some close ups....


Hugs'n'spooky snogs,
Julie xx

Wednesday 19 October 2011

Halloween Microscope Slide By Carol Fox


This week I have used two pieces of memory glass to make a little hanging decoration. I did a little collage to fit the glass and then sandwiched it between the two pieces with UTEE to make a faux solder. I did not have the colour UTEE I wanted so after it was set onto the glass I added a quick tap over with a paint dabber in black to make it a bit more gloomy looking. I also used this on the small charm at the bottom and the jewellery connector that I have used at the top to hang it from.

There is still plenty of time to enter the current challenge, all the detials can be seen in the blog post here.

Saturday 15 October 2011

Spooky Book Time by Helen Chilton


Stamps used:
Artistic Outpost: Whimsical Melange; My Favourite Book
Pink Paislee: Phantom

Other Materials
StazOn inkpad: Jet Black
Distress Stains: Weathered Wood; Milled Lavender
Distress inkpads: Weathered Wood; Milled Lavender
Coloured pencils
Patterned paper: Prima: Moulin Rouge

Here I’ve used both Artistic Outpost and Pink Paislee stamps to create a spooky card for Hallowe’en. The house is stamped and then coloured with the Distress Stains and stamped with the Distress inkpads. I’ve then used the Phantom stamps to add all sorts of detail. Although the My Favourite Book stamps are not for Hallowe’en, I’ve used Hallowe’eny colours and given her striped tights and added the number 31 to the book cover. She’s also got an owl sitting on the back of her chair.

The current Happy Daze challenge is Christmas or Hallowe'en. You have until Midnight on 31st October when one winner will be drawn at random to win a £15 voucher and free P&P to spend in the Happy Daze shop. Maximum of 3 entries per person & you must use at least one product which can be purchased in the Happy Daze shop.

You can enter by:
  • blogging and entering a link using the Linky Widget  here,
    emailing your picture to info@happy-daze.net
    uploading your photo to their facebook page

Thursday 13 October 2011

Pretty Spooky Banner By Ruth Philips

Pink Paislee have done it again with their new and exciting range of Halloween papers and embellishments.
The Phantom Happy Haunting Banner comes as a pack of letter cards, two spooky skull cards and two crepe paper rosettes to finish it off.


I made my banner by using calico (curtain lining) folded in half and stitched. I distressed the edges with scissors and painted the middle with Claudine Helmuths black and white Gesso. An old credit card came in handy to smudge the stripes evenly across the material.


Lace was glued along the top and eyelets added with a crop-o-dile.


5cm wide strips of black crepe paper were ruffled on my sewing machine and glued behind the letter cards. I trimmed them down so you could still see the paint behind, tied them all together with some re-purposed ribbon and voila......it cost less than a shop bought one and will certainly last a lot longer!


HAPPY HAUNTING EVERYONE!

Tuesday 11 October 2011

A Victorian Christmas by Paula Tidman


This christmas decoration uses Artistic Outpost Sleigh Ride stamps. I die cut six shapes from thick card using the Tim Holtz cabinet card die, which I glued together to make the frame. I stamped the image of the two children and masked, then over stamped with the trees. The image was tinted with distress inks  & the frame was painted in red studio acrylic paintI screwed a hinge onto either side of the frame and finished with stickles and gold corners like these.

The current Happy Daze challenge is Christmas or Hallowe'enYou have until Midnight on 31st October when one winner will be drawn at random to win a  £15 voucher and free P&P to spend in the Happy Daze shop. Maximum of 3 entries per person & you must use at least one product which can be purchased in the Happy Daze shop.
  • You can enter by blogging you address to the linky widget here
  • emailing your picture to info@happy-daze.net
  • uploading your photo to their facebook page


Sunday 9 October 2011

a "Stella" Hallowe'en by Joanne Wardle

In previous posts I have used Stella Sitting on various props, and have used masking to achieve this. I know that a lot of people find masking a bit too "faffy", so for this card I used the simpler "cutting out" method!!
I just stamped Stella, the broom and hat, onto white card coloured with pencils and cut them out.
I made the moon background by cutting out a circle mask (by drawing around the inside of a roll of sellotape), then applied black soot and pumice stone distress inks with a cotton wool ball. I
removed the maks, applied a litle more pumice stone ink, for clouds. I stamped happy (from Happy unbirthday) and old english Hallowe'en. I glued Stella and her accessories in place.
All of the Stamps are from Jo Capper-Sandon's range from Stampotique Originals.

Friday 7 October 2011

Hocus Pocus earwire by Julie Dandy


hi everyone, this week I am sharing a cute little piece of jewellery for Halloween or just for anybody with a secret dark side ;-)

It features the brand spanking new Pink Paislee Phantom clear stamps :D

They are super cool and not strictly for Halloween with the cute little cameos and bird cage.
I stamped them on to shrink plastic using a black promarker as I found archival ink too wet, particularly with clear stamps.

I added lots of beads, chains and a cute little vial coloured with red alcohol ink.

Here's a few more pics for you with a little bit more detail :D

Hugs'n'snogs,
Julie xx

Thursday 6 October 2011

A Haunting We Will Go By Carol Fox


I should have posted this yesterday, but I was bad and did not get it finished to photograph it in daylight. But here it is better late than never....I hope.
I love Halloween, and when I saw the new stamps by Jo Capper-Sandon, I just had to have this funky little witch, as this witch is not for Halloween it can be used all year round. I just wish I had got the witches hat so she could have worn it while taking her pet dragonfly for a midnight run.
This started life as a beer mat which I first gave a coat of black acrylic paint. Then I masked it with a Tim Holtz mask and used Inka Gold In Orange Over the top, its the first time I have used Inka through a mask and I was very pleased with how it looked.
The Dragonfly and Stella were stamped onto card, cut out, coloured and then stuck on. I do like to mask but with my background being so dark it was not really an option.
Once they were in place I stamped the quote which is from The Artistic Outpost set Haunted Halloween, coloured it with spiced Marmalade distress ink and stuck it on.
I then applied Orange peel stickles to the background with my finger.
I have punched holes in the top corners to add ribbon to hang it by, but I didn't realise I was out of black ribbon utill I went to use it and only 6 inches of it rolled from the reel.
I have a little great niece who's birthday it is on the 30th October, I shall send her this for her birthday card, as my actual cards leave a lot to be desired.

For details of this monther challenge and how to enter it click on the link in the side bar.

Monday 3 October 2011

Hocus Pocus by Helen Chilton - with pic this time!


Pink Paislee papers: Hocus Pocus

I've turned the little girl into a witch by adding a witch's hat. The frame is stamped onto purple Hocus Pocus paper and edged in bronze paint that is heated to make it bubble. The scroll is stamped all round the edge of the card and coloured with pencils. The word 'BOO' is taken from the Book quote - I've just cut off the last letter!

Hocus Pocus by Helen Chilton


Pink Paislee papers: Hocus Pocus

I've turned the little girl into a witch by adding a witch's hat. The frame is stamped onto purple Hocus Pocus paper and edged in bronze paint that is heated to make it bubble. The scroll is stamped all round the edge of the card and coloured with pencils. The word 'BOO' is taken from the Book quote - I've just cut off the last letter!

Saturday 1 October 2011

It's Christmaaaaaaaas (and Hallowe'en)

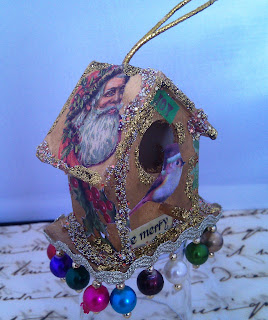
On what feels like the hottest day of the year we are getting started on Christmas! the Design Team have been playing with Mini Bird Houses to create Christmas decorations. Helen Chilton has used Pink Paislee Butterfly Garden stamps and coloured them to look like Christmas roses. Red paint, gold embossing. layered up foliage and gold paint heated to bubble it up!


Paula Tidman has made icicles from parchment paper, Glossy Accents and glitter and applied PVA glue and acrylic paint crackle effect technique .  There are 2 ways of  doing this and it depends on your PVA which one works.  The first method involves painting the base colour and letting tit dry fully.  Then a layer of PVA and letting it dry - no heat gun - and when fully dry painting the top colour on and leaving it.  The second method again starts with a base coat colour left to fully dry, then a layer of PVA and immediately while it is wet a layer of the second colour over the top.  Leave to dry.  To know which one works for you do a test of both methods first on some spare card.  Paula has also added a charm to complete.

Joanne Wardle also used this crackle effect but added distress by scraping more of the top layer off with scissors before the paint dried fully but was tacky .  Once dry, she added metallic rub on to the craem fror hifghlight and stamped Mistletoe by Jo Capper-Sandon for Stampotique Originals onto kraft card, cut out and attached to house, addeed Glossy Accents on the berries, a knotted piece of gold ribbon and filled the birdhouse with raffia.


Ruth Philps has gone for a table decoration with this Bird House in a glass case.  She has decorated the Bird House with  Pink Paislee Parisian Anthologie paper  and lots of blingy stuff, and there is a wood fence nestled in there too.

Carol Fox has created a place name for the Christmas table. To create this effect cover the roof of the bird house with Tim Holtz Idea-ologyTissue Tape then spray it with Adirondack Colour Wash Spray in Cranberry and Perfect Pearls Mist in Heirloom Gold. Using Cosmic Shimmer Bronze Lustre Ultra Thick Embossing Crystals along the roof and base edges and also apply it randomly to the roof to give it a bit of glimmer. Colour a wood spool with the same colour inks and when dry attach to the bottom of the bird house for a stand using Claudine Helmuth Multi Medium. Remove the hanging cord and push a Tim Holtz Idea-ology Memo Pin into the hole and secure it with glossy accents. Colour 2 of the filigree corners with Inka Gold paint in Old Gold and attach to the front eaves of the house using Multi Medium. Using some wire and threading beads on as you go wrap the house with the wire securing it at the base and the Memo Pin at the top.Stamp and emboss a small quote to attach to the front of the house and place in the memo pin

Julie Dandy went for a Shabby Chic cuckoo clock. She removed the peg from the front of the house and covered it in Websters pages sweet season paper from the 6x6 pad. Any exposed wood was painted with Viva Decor Inka Gold paint in silver applied with a brush. This was also used this to colour the bronze coloured charms. Glue on the prima lace with glossy accents then add Rock Candy Distress Stickles all over the house to give it a pretty sparkle then glued on charms. Julie made the paper beads by rolling triangle shaped strips around a pokey tool then glueing the ends. These were strung on to eyepins and suspended them from chain on the bottom of the house. Add a few buttons and a cute hanging ribbon and the little bird house was transformed in to a pretty shabby chic cuckoo clock to hang on the Christmas tree

Moira also went went for a tree decoration, after all at only 6cm tall these are a pefect size to trim the tree.  This Bird House has a vintage feel, using Inka Gold paints, vintage collage, some bauble trim, beadazzles and stickles.  I think you can tell we had fun

And Christmas or Hallowe'en is the theme for our October challenge.  It could be a card, a decoration a layout, gift box etc., whatever you like that fits either Christmas or Hallowe'en.

You can enter in one of 3 ways:
  • Blog your entry and use the Linky widget below to link to your blog entry
  • Load to the Happy Daze Facebook Page
  • Sent a pic by email to info@happy-daze.net


The challenge will end at Midnight Monday 31st October 2011. One entry will be drawn at random to win a £15.00 Gift Voucher plus free P&P for the Happy Daze shop. Maximum of 3 entries per person. Entries must use at least one product which can be purchased in the Happy Daze shop.

A Winner is Announced

The Winner of our September Challenge is Marjorie's Owl.  Congratulations. Send me your name and email address and I'll get a £15 Gift Voucher off to you