Showing posts with label Inka gold. Show all posts

Sunday, 5 May 2013

Forget me not....by Julie Dandy


As soon as I saw the Graphic 45 Secret Garden I had to have it...I'm sure it was made just for me LOL

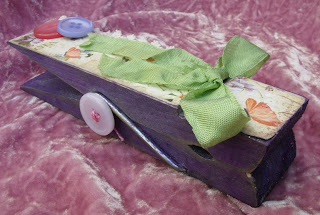
I decided to finally use the giant peg I got from Happy Daze, which I had already sprayed purple with cosmic shimmer agggggeesssss ago - it was a failed Halloween project (never throw anything away!!!)


So to start with I covered the front panels with my paper, sanded and inked the edges lightly and added lace, buttons, seam binding ribbon and distress stickles in Victorian Velvet.All the pieces were glued down with Claudine's Matte Medium.

The frame is some chipboard shapes I already had and matched the panels in the G45 paper perfectly (which was a happy accident rather than planned LOL)
I used Inka gold on all the edges then covered with the paper, sanded and lightly inked with Frayed Burlap.


I decided to make a little blackboard on one side of the frame with some self adhesive black board material I had picked up in The Works ages ago, so stuck it on a piece of plain chipboard.


I covered the other side in the patterned paper with a little bit of layering and tearing to age it, then cut out the panel from the paper pad and glued on.

I added my Forget me not message with Tiny type clear stickers and  highlighted with blobs of glossy accents.


I added some lace to the reverse of one of my frames around the edge then  glued the sandwich together with glossy accents, which dries quickly and really holds the chipboard nicely - just don't get it on your pp.

I glued on the buttons and Prima flowers but it just didn't look finished, so I made some holes with my trusty pokey tool and embroidered through the sandwiched frame.


 The cross stitch looked pants on the reverse side so I covered a chippy heart and glued over the yucky stitching ;-)


The little dangly is a scrap piece of chippy covered in paper and die cut with a sizzix jewellery die with buttons added on jump rings.

To finish it off I added more distress stickles and rock candy stickles because I just have too add sparkle (it's the inner magpie in me ;-) ).


So now I have a cute little memo Blackboard that I can write my important messages on, that looks really pretty just sat on my desk :D


Hugs'n'snogs, Julie xx


Sunday, 18 November 2012

'' You're A Star ''

Hi, am back again using the new Artistic Outpost stamps - Picture Star.


Using Distress Inks and watercolours, diluted Inka Gold, Stickles and the rest from stash.

The little girl is a real cutie pie and she obviously loves her new dress doesn't she !

Wishing you all a great week ahead.  Take care of yourselves, hugs Annette x

Friday, 24 August 2012

Love, all the days jar.... by Julie Dandy

The Happy Daze current monthly challenge is, inspired by the Olympic rings, so I thought I would alter a cute round glass jar I picked up in Matalan for just £2!!

I used this amazing Paperbag Studios stamp on to kraft cardstock with black archival ink.
The sentiment reads "May you love... all the days of your life" - I stamped the first part on to a scrap of Tilda fabric, then glued it over the stamped image and highlighted with a TH fragment.
I used Picket Fence distress stain and distress marker to grunge it up a little and highlight areas, then added distress stickles and glossy accents to highlight the words.

The lace was stained with a spritz of distress reinker in a mister with water and the TH foliage was coloured with TH distress embossing powders.and I added a small piece of tissue tape coloured with distress stain.
The lid of the jar was coloured with Viva decor Inka gold, alchol inks in willow, pink sherbert and snowcap mixative, then splodged with distress stickles, I then added some fabric, buttons and a Philosophy tag.
I then added some lace and an TH adage ticket to the base in a memo pin.


The lace around the top was also coloured with the distress reinker and distress stickled.
I added some fabric and buttons in to the bottom of the jar, glue a piece of lace to the back of the jar, then added the stamped image.

Pretty cute huh :D
Hugs'n'snogs,
Julie xx     

Tuesday, 13 March 2012

Renaissance Plaque designed by Paula Tidman


I bought some fimo recently and decided to make a small Renaissance inspired project. I used the non bake variety and rolled out to about 1cm thick and then stamped with one of the houses on the  artistic outpost whimsical melange sheet. I used a script stamp in the centre, then left to dry for about 24 hours. It was then painted with studio acrylic paint in blue, zapped with a heat tool and distressed with the studio black paint. I highlighted the lettering with a krylon gold leafing pen. Then brushed on some heirloom gold perfect pearls. The plaque was coated with lisa pavelka magic gloss resin. The image was downloaded from the internet and placed in a chipboard frame which was given the inka gold treatment. Finally adding some gold german scrap, pearls and a filigree charm similar to this one

A quick reminder about the current Happy Daze Challenge which  you still have time to enter. It is "March to your own tune" So anything with a musical theme.  One lucky winner will be drawn at random to win a  £15 voucher and free P&P to spend in the Happy Daze shop. Maximum of 3 entries per person & you must use at least one product which can be purchased in the Happy Daze shop.
  • You can enter by blogging you address to the linky widget here
  • emailing your picture to info@happy-daze.net
  • uploading your photo to their facebook page


Wednesday, 7 March 2012

Paris Exposition Vanity Box By Carol Fox

I have used the Artistic Outpost stamps Paris Exposition and French Flight to alter this Box. The Box is one of the Vanity Boxes available from the shop.
The background has been created by using a crackle paint background, I found the blue was too bright when this was done, so I applied a coat of Picket Fence distress stain which gave it a lovely aged look.
Viva Inka Gold in Hematite was applied through a crafters Workshop Stencil.
All the stamping was done using black archival ink.
Acrylic fragments and arrows were added to the lid.

The challenge this month is "March To Your Own Tune" use anything musical. For full details of the challenge have a look HERE

Tuesday, 14 February 2012

Altered Box By Carol Fox

To fit with this months challenge theme I have altered a box, yes I love boxes, but better than that I have used another love Viva Inka Gold. So there is it, it's out in the open I have two loves, but it's ok they know each other and they are quite cool about it, and as they work really well together neither minds.

This is one of the larger sized wooden boxes from the shop. I have simply coloured it with Inka Gold in Lava Green and Steel Blue and together they give this lovely patina shade which I love.

I have stamped on the peacock stamp who's maker eludes me using Archival ink, you must use an archival ink over the inka gold or else the image just seems to disappear. I finished the image with a bit of glossy accents here and there just to highlight bits of it.

I have embellished it with one of the lovely peacocks which were a gift from a friend. I also used the Inka gold on this as its a brass tone metal charm. A large button from my stash for a faux knob and there is it all finished.

A lovely quick little project.

To see all the details of this month challenge take a look at the original post here and you will also get the chance to see Netty's lovely frame again.


Tuesday, 10 January 2012

Leonardo Lovelies!


Hoping to see the Leonardo Da Vinci Exhibtion at the National gallery soon, in the meantime I have satisfied my craving for all things Da Vinci, by making this little shrine. I used the little wooden arch which I gessoed and painted in matt emulsion. Then using black archival ink I stamped the Lost Coast designs Mona Lisa and Door and Window set. The other lovely lady is from my collection. I used inktense pencils to paint the images and background. Finishing with a touch of Inka gold in copper.

A quick reminder about the current Happy Daze Challenge which is Try Something New for the New Year. It could be a new technique you have recently discovered or some new stash you can't wait to to use. There is still plenty of time to enter. One lucky winner will be drawn at random to win a  £15 voucher and free P&P to spend in the Happy Daze shop. Maximum of 3 entries per person & you must use at least one product which can be purchased in the Happy Daze shop.
  • You can enter by blogging you address to the linky widget here
  • emailing your picture to info@happy-daze.net
  • uploading your photo to their facebook page


Friday, 9 December 2011

Santa stop here...... by Julie Dandy

This week I was inspired by T!ms 12 days of Christmas day 4 tag but made it in to a Santa stop here door hanger.

I started by covering my wooden door hanger with Pink Paislee Santas list patterned paper.
I inked it with and then splattered and spritzed on water to give a nice mottled grungey look.

I used Viva decor Inka Gold on the wooden edges which I found easiest to apply with a semi dry baby wipe.

Th ruffle on the bottom is made with pleated tissue tape - I put a piece of double sided tape on to the base first then pleated the tape along it.

My lace was coloured by putting distress stain on to my nonstick craft sheet, adding a little water to soften the colour and squishing the lace in to it until I was happy with the coverage.
I glued it down with Claudine's matte medium.

I ran a piece of acetate through my big shot with the TH snowflake border embossing folder and cut around the snowflakes.
I attached this with a little DST along the edge that would be hidden by my embellishments.

My snowman and snowflakes were cut from grunge board then painted with pearl acrylic paint dabber.
I coated the snowman with Rock Candy crackle glaze and left it to dry thoroughly , when dry I highlighted the cracks with distress inks.
I added the snowflakes with glossy accents and added buttons to the centres.
I tied some scraps of ribbon and fabric round his neck for a scarf and dangled some buttons strung together with jump rings from it, then attached him to the hanger with foam tape to add some dimension.

My little sign was hand written on to the back of an journalling ticket and pinned on with a memo pin

The last thing I did was smear on lashings of Rock Candy distress stickles to give it a lovely sparkly frosty feel.

Have fun,
hugs'n'snogs,
Julie xx

Wednesday, 7 December 2011

Still obsessed


These boxes from the shop are the thing I just want to decorate all the time as they are so quick and fun to do.
This one has been painted a rusty brown colour, a bit of rubber stamped text for the background before given a quick rub over with some Inka Gold. The charm and Tim Holtz sprocket gears and spinner were rusted before being glued on. I also added a few bits of old watch pieces from my personal stash.
The faux knob is a button from my ever growing stash of vintage buttons.
These little boxes are the perfect size for cufflinks and earrings so if you are stuck for a christmas present go make one and get the warm glow of giving a present that you have made yourself.

I USED

Tuesday, 15 November 2011

A Medieval Christmas By Paula Tidman


The current Happy Daze Challenge is 'Explosion of Colour', so I decided to make a tag in bold colours. I used distress stains in Wild Honey & Barn Door to create the background. I used gold embossing powder for both latin scripts and around the edges of the tag. I stamped one of the houses from the Artistic Outpost whimsical melange in black embossing powder, then cut out and added the digital image of the Madonna and Child. I used one of the hinges from the  Tim holtz elements and covered with Inka gold. I dyed some ribbon with the same distress stains and added some fibres from my stash.


The current Happy Daze challenge is An Explosion of ColourYou have until Midnight on 30th November when one winner will be drawn at random to win a  £15 voucher and free P&P to spend in the Happy Daze shop. Maximum of 3 entries per person & you must use at least one product which can be purchased in the Happy Daze shop.
  • You can enter by blogging you address to the linky widget here
  • emailing your picture to info@happy-daze.net
  • uploading your photo to their facebook page

Friday, 21 October 2011

Death bangle by Julie Dandy


Can't find the perfect jewellery to go with your halloween costume? or do you want something just a little bit different to everybody else's??

Then pick up some of these amazing wooden bangles from Moira at just £3.55 for a set of three!!! :D

They have a lovely smooth surface so are very easy to colour.
I coloured mine by rubbing on Viva decor inka gold and polishing it up.

I then stamped white tissue paper with images from these fabby Pink Paislee Phantom stamps .

I glued them on with Claudine Hellmuth matte medium being careful not to get any on the front of the image as I wanted to tint the images with distress Spiced Marmalade ink pad.

I lightly spritzed patches of the bangle with Cosmic shimmer mist - just a little warning though, the pigment is very strong in these and stains very easily.....I have very purple hands right now!!!

I glued on some little patches of grey lace with the matte medium then when dry smeared on some distress stickles in Spiced Marmalade and Chipped Sapphire.

When everything was dry I sponged on more matte medium to seal everything in place.

You could make bangles to match all your outfits with these very affordable bangles :D
Now for some close ups....


Hugs'n'spooky snogs,
Julie xx

Wednesday, 17 August 2011

Love Potion #9 By Carol fox


Using one of the lovely new Artistic Outpost plates, Apothecary I have altered a bottle to make a love potion bottle.
The bottle was coloured using Alcohol inks. I shaped some of the Filigree corners to fit around the base of the bottle glueing them to hold them in place. Once they were set in place I rubbed some Inca Gold over them.
I added charms, beads and chains to the bottle as shown.
Now for the yummy rubber stamps, I stamped the Witches potion image onto shink plastic, punching a hole and cutting it out just outside of the border before heating it, when shrunk I rubbed old paper distress ink over it. I attached it with a jump ring to the top of the charms.
I stamped the receipt image onto thin cream paper, adding the love potion #9 and the 60c images. I then inked the recipt with a pale yellow ink. I then screwed it up and inked it over the creases using old paper to give it a very aged and distressed look,like it had spent many years in a coat pocket.
Finally I added the love potion #9 image to a small tag to identify the contents of the bottle as it would never do to confuse the potion to win your true loves heart with a bottle of poison.

Thursday, 11 August 2011

Beside the Seaside - By Carol Fox


The perfect mirror for a little mermaid to use in her underwater kingdom.
The mirror is one of the lovely blanks that are in the shop in two shapes of a heart and an oval.
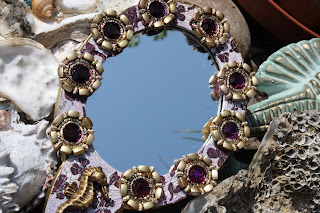
I crackled a background using a purple and a cream acrylic paint, when this was dry I over inked it with dusty concord distress ink. This already look pretty good, but I wanted a bit of texture to it, so using a mask and Croco Colour in Blackberry I added a pattern detail to it. I also did this all over the back of the mirror and you can see from the photo how lovely the Croco works through a mask.
I went around the sides of the mirror with a thick coat of gold embossing powder.
The jewels around the mirror are from the shop, I do love these and the great thing about them is that they can be coloured with alcohol inks. I had to do this as I had a random colour selection of them, so using Raisin alcohol ink I did them all the colour I wanted.
The little seahorse is made from a mould with utee melted in my heat pot and then given a bit of a rub over with Viva Inka Gold to make it all gold and shimmery.
The theme for the new challenge this month is I Do Like to be beside the seaside and there is the prize of a £15.00 shop voucher plus free P & P up for grabs. So do check out all the details of how to upload your items by having a look HERE. You Gotta be in it to win it.

Wednesday, 13 July 2011

Captured Fairy Box by Carol fox


I had had this little fairy buzzing around my room for the last few nights causing havoc, knocking things over and being very naughty, I eventually managed to catch her, the first thing that came to hand was an old pocket watch front and as soon the fairy landed on this little box I managed to get the watch front over it. As with all fairies as soon as they are caught they freeze and become suspended in time until they are freed again. But I must admit I think she makes a lovely addition to the top of this box.
The box is one of the wooden ones from the shop. I first of all gave it a coat of modern masters copper paint which I treated with the green patina finish to age it.
All the watch parts are purposed from old pocket watches and clocks. The clock hands are two game spinners that I have cut down. The fairy charm,Dragonfly and numbered pin are all available from the shop.
Once everything was in place I gave it a light coat of resin to hold it all in place and give it a nice shine. I also painted the sides of the box with the resin as it makes it go a lovely colour.
Th When it was all dry I gave it a quick rub over with some Viva Decor Inka gold just to give it a bit more of an aged look.
The Feet are the Tim holtz Foundations box feet and Key Hole is one from the Tim Holtz Locket key Set

Please Note: That no faeries were hurt during the making of this box LOL

As This has a dangly key on it, it will also fit in with the current challenge this month of Dangly Things. Have a look HERE to see all the details of how to enter.