Tuesday 28 February 2012

Art Journaling By Paula Tidman


I decided to have ago at making an art journal using some recycled packaging to make the cover. I started with some plain white card and applied some distress stains in pine needles and dusky concord. Then diluted some distress re-inker in dusty concord and added some mica powder then sprayed on the the card. I lightened the page by adding a wash of watered down gesso. Then used bleach on one of my rubber script stamps and stamped it randomly accross the page & overstamped in black archival ink.
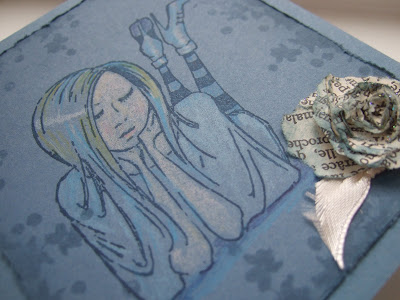
I used paper bag studios Be Happy cling stamp  and used distress inks to colour. This stamp so reminds me of photos of myself when I was younger. I sadly sported exactly the same haircut with the short wonky fringe LOL!  I then stamped artistic outpost whimsical melange. I added some words I printed on the computer and used matte medium to glue the page to thick grey cardboard.


The back of the journal was created in the same way and the stamp used is Paperbag studios windsong . I cut up my own paper to put in the journal a mixture of watercolour paper and thick card as I find a lot of the ready made books have quite thin paper.

 A quick reminder about the current Happy Daze Challenge which  you still have time to enter. It is Love, a Technique you love to use. It could be new or a your favourite tried and tested technique.  One lucky winner will be drawn at random to win a  £15 voucher and free P&P to spend in the Happy Daze shop. Maximum of 3 entries per person & you must use at least one product which can be purchased in the Happy Daze shop.
  • You can enter by blogging you address to the linky widget here
  • emailing your picture to info@happy-daze.net
  • uploading your photo to their facebook page

Monday 27 February 2012

Feb 2012 Tim-esque tag... by Julie Dandy

Well you probably  all already know this news but T!m has sadly decided to retire his Twelve Tags of Christmas with very good reason after listening to retailer feedback at CHA last month.
The good news is he has decided to make a monthly tag sharing techniques and tips :D

He launched the first of his tags at the beginning February HERE with the gorgeous Love themed tag below.

Unfortunately I didn't have any of the products T!m used, not even close LOL, so had to make some major improvisations with my tag as you will see LOL. 

To start with I didn't have an embossing folder with a matching stamp so had to think of a way I could add colour to my raised image - I could have just swiped over the embossed image with an inkpad but I wanted to try something different.

I decided to try out my new distress markers, so coloured in the debossed images on the folder, placed my tag in, huffed on it to refresh the ink (that seems to be the technical term LOL) and ran it through my big shot.
Voila - once nicely inked raised image :D 
In hindsight I wish I had inked my tag first as when I went in with my blending tool the embossed areas picked up a lot of the colour - lesson learned ;-)

As I was going for a sewing theme I diecut a piece of chipboard with the mannequin die and coloured the base and top with my frayed burlap ink pad, then added the same colour distress stickles.

I cut the body section from some of Claudine Hellmuths sticky backed canvas and this time coloured it with my Victorian velvet ink pad (see, I did learn my lesson LOL).
I then followed the same embossing folder technique using the Victorian velvet pen, the attached it to the chipboard base. I added some little stitch details with the fine end of my frayed burlap pen., then stuck it to my tag with glossy accents

I decided for the lace die cutting to use a piece of glassine paper which I inked once crumpled with broken china distress stain, then attached with staples.


I didn't have any appropriate stickers for the tag so I cut the words from the Kraft 12x12 resist paper, inked it with my distress stain, then added  faux stitching with my picket fence pen.

I was going to colour my ribbon with  distress stain but didn't really want such a strong colour, so I scribbled on my craft mat with my marker pen, spritzed with water and ran it through the ink, giving it a much softer colour.

I didn't have any charms that worked quite right with my tag so I used my old faithful buttons but it didn't seem enough. 
I improvised again and die cut the little cotton reels from clear shrink plastic which I coloured with Snow cap mixative and ginger alcohol ink before shrinking, then wrapped them with thread.
I think they look really sweet :D

Are you all joining in??
I will be trying every month and will be linking it via Mr.linky on T!ms blog for the competition :D

And for those of you wanting to try the distress markers Moira has them on order so should be here soon  ;-)

Have fun,
Hugs'n'snogs,
Julie xx

Sunday 26 February 2012

Sticky Stuff by Samantha Read

I may have said this a thousand times but a technique I love to use is stamping on white tissue paper, colouring the image if needed, and then applying to a surface with PVA glue.
Looking at me in my jeans, t-shirts and trainers, usually covered in mud you would never guess that I love to be surrounded by pretty things and I thought this plain, clear plastic sellotape dispenser was about as unpretty as it could be, so .......
An old book page toned down with gesso and 45 minutes later I have a pretty tissue tape dispenser, ah that's better.

I used:
Black Archival Ink Pad (it's essential to have waterproof ink for this method!)

Wishing you a very happy day, Sam xxx

Friday 24 February 2012

Sunshine Smile canvas by Julie Dandy

I have had my eye on THIS gorgeous Paperbag Studios stamp for some time and when I was browsing them AGAIN this project jumped in to my mind :D

This months theme on the Happy Daze blog challenge is a little twist on the usual valentines LOVE theme and is techniques you love to use.

I decided to show you my fave technique with one of my fave products Viva Decor Croco which I kind of invented (well I think I did anyway LOL)

I started by by stamping the image in black archival ink on to a piece of white tissue paper and ripped out the image so it had a nice random torn edge. I glued it in place on my canvas with Claudines matte medium.
I painted on some detail to the image with a little bit of wild honey distress stain.

I made myself a shimmer mist by mixing Wild Honey distress reinker and Perfect Pearls in Sunflower Sparkles in a mini mister and spritzed it over a Prima mask
I coloured these lovely Pink Paislee chipboard alphas, which have a fabby resist pattern on them, with Wild Honey distress stain and glued to the top of the canvas with the matte medium.

I tied a piece of white ribbon along the botom edge and knotted it.

I die cut my flowers from chipboard using Tims tattered floral die and coated them with the platinum croco.
When dry I dotted on alcohol inks in shades of yellow and left to dry again, this is important as we want the alcohol to evaporate before we heat them ;-)
When completely dry and alcohol free I squished them on to a versamark inkpad and made sure they were nice and sticky, then sprinkled on UTEE.
The daisy one is coated with pearl (which was a happy accident LOL) for one coat and then clear was sprinkled in while still hot and heated again - it gave it a nice mottled effect.
The other flowers were coated with three layers of clear with a little bit of glitter sprinkled in.

When cool I glued them on to the canvas and added buttons for the centres, then added three little buttons under the word Smile.

To finished it off I added distress stickles randomly in scattered straw to add a lovely subtle sparkle.
I think she is so pretty and definitely makes me want to smile :D
If you would like more inspiration and a tute on my Croco faux dichroic technique please visit THIS BLOG POST.

Hugs'n'smiley snogs :D
Julie xx

Thursday 23 February 2012

Steampunk Time Travellers Book - By Carol Fox

Among the new Artistic Outpost stamps available in the shop are this lovely set, Industrial Backgrounds
I have altered this small hardback notebook using them. I coloured the brown board cover using Inca Gold,  I  stamped on it front and back. I then glued a sheet of copier paper over it, tearing it away where the stamped image was underneath to reveal the cogs and engine on the back.

I inked it using distress inks, stamping the images first in distress ink and then in black archival to build up a background.

Adding the final stamped images of the plane, propeller and certificate. A few bits of Tim Holtz Ideaology and charms finish it off.

Wednesday 22 February 2012

Welcome to London - Gatefold Card By Helen Chilton


For this Helen has used  the New Artistic Outpost London Elements plate and the London Underground one.


Helen has done the background using oil pastels. Diamond and cog stencils were overstamped with Black Cherry, Midnight Blue and Saddle Brown Stazon. It has been embellished with washers, eyeletsm brads, ribbons and Diamond Glaze.

Tuesday 21 February 2012

City Of London Mug By Helen Chilton


Helen has made this lovely mug  using the new London Elements plates by Artistic Outpost. This is a companion plate to the lovely London underground plate.

Helen Stamped straight onto the mug Using Black StaZon, Cherry Black and Hydrangea Blue.The background was filled in with fine text from the London Underground plate bordered with half the flag top and bottom from the same plate. The clock and shield were coloured using a cotton bud.

Monday 20 February 2012

Loving my New Stamps from Happy Daze - Annette Goatley (nettyscraftings)

Hi, have you seen the new stamps from Lost Coast Designs at Happy Daze?  No......well let me show you two of them and you can decide whether you would love to own them or not.


Made this card with the fab Steampunk Bicycle Lady..............the background (map) stamp is by Scrolls Work, also available at Happy Daze.


and this one with the Face Spiral, which I love as well. They both stamp beautifully, lovely and clean stamping.  Methinks they will sell out quickly...........

If you have a new stamp which you love why not enter it into the Happy Daze Challenge this month, or if you have a technique you really enjoy, pop that in as well. All details can be found here on the blog, and remember the great prize Moira offers one of you......not to be missed I assure you.

Have a great week and will be seeing you soon.  Hugs Annette x

Sunday 19 February 2012

"blue" by Joanne Wardle


Continuing the theme of using techniques that we love this month. I have decided to go with my all time favourite technique of colouring with pencils. Usually I colour onto Kraft card, but I wanted to show how it works just as well on any coloured card.


I also used another technique I love: Making tatty paper flowers which I also inked with stormy sky, and added just a hint of stickles


I stamped Jasmin in a dark blue ink (deep lagoon, versafine) and coloured with pencils, I inked around the edges of the card with stormy sky distress ink, and also stamped with abstract foliage with the same ink.


Friday 17 February 2012

Every Day Love by Samantha Read

Valentine's Day may have been and gone but I like letting the people I love know all the time so I decorated this wooden heart for my daughter. I hope she likes it! 
To keep in the challenge theme of using a technique I love I just had to get out the tissue paper! Stamping on tissue paper and then applying with pva glue has just got to be one of the best stamping techniques, just my opinion! Using this technique you can get your stamped image onto just about any surface, smooth or bumpy, flat or around bends and almost any 3D object.

I used:

Wishing you a happy day, Sam xxx

Tuesday 14 February 2012

Altered Box By Carol Fox

To fit with this months challenge theme I have altered a box, yes I love boxes, but better than that I have used another love Viva Inka Gold. So there is it, it's out in the open I have two loves, but it's ok they know each other and they are quite cool about it, and as they work really well together neither minds.

This is one of the larger sized wooden boxes from the shop. I have simply coloured it with Inka Gold in Lava Green and Steel Blue and together they give this lovely patina shade which I love.

I have stamped on the peacock stamp who's maker eludes me using Archival ink, you must use an archival ink over the inka gold or else the image just seems to disappear. I finished the image with a bit of glossy accents here and there just to highlight bits of it.

I have embellished it with one of the lovely peacocks which were a gift from a friend. I also used the Inka gold on this as its a brass tone metal charm. A large button from my stash for a faux knob and there is it all finished.

A lovely quick little project.

To see all the details of this month challenge take a look at the original post here and you will also get the chance to see Netty's lovely frame again.


Sunday 12 February 2012

My Winged Girl by Annette Goatley (nettyscraftings)

Hi, to be asked to make something we love is no hardship is it...............


First I would like to show you an Altered Beermat using the Winged Girl by Lost Coast Designs.  This was created first with a layer of black Gesso.  Then used  another beermat, again covered with black Gesso and  adhered a paper napkin to it. Gave it a top layer of white Gesso.  Attached the lace between the two beermats (making a sandwich) threaded beads through ribbon for the hanging and then glued the two together with The Ultimate Glue.  Fussy cut the stamped image,  added Turquoise flowers and stones.  Finished it off with Turquoise Stickles.  Stamped the words ' Dreams are whispers from the Soul' and thats it complete.


This is going to a friend of mine so thought it would be nice to make a matching card.  Using the same coloured stickles for the outline and filled in the wings with 3d gloss so it gives a translucent effect.  Hope you like these projects.  Take care and look forward to seeing your makes this month.  Hugs Annette x

Thursday 9 February 2012

Parisian flight .... By Julie Dandy

This week for Happy Daze I decided to decorate one of these fabby WOODEN SHRINES with one of my all time favourites - Crackle :D In particular Viva Decor Croco which has to be the best crackle medium ever!!!

I started by painting the shrine with white acrylic paint and when dry spritzed it with cosmic shimmer mist .
I added some dimension with artists spackle using the Prima Eiffel tower mask from the Parisian set.
When dry I replaced the mask and spritzed again with the cosmic shimmer so that the masked area remained white.

I stamped my images from the Artistic Outpost Paris Exposition stamp set on to white tissue paper with black archival ink and roughly cut out the images and glued in to place with Claudines matte medium. You can't see the tissue when its dry so you don't see the edges.

I gave it all another spritz with a darker cosmic shimmer and dried it off with my heatgun.
I then added the croco roughly with a palette knife, making sure I caught my textured area, then dried it off with my heatgun. I repeated this until the whole piece was coated.
I the used Alcohol inks to add detail to some of my images and to tint the tower and the edges.

I tied a piece of ribbon around one side of the bottom of the shrine and tucked in a little stamped ticket.I love crackle mediums but Croco is my absolute fave, if you haven't tried it you really must :D
The colours are so rich and the lustre is so sparkly and pretty :D
Now then, have you been following the new releases that have just been launched at CHA???
There are some pretty amazing things coming our way soon, and these are two of my faves :D
Vintaj Patinas
Tim Holtz Distress ink pens

AND a little dicky bird tells me that these will be heading to Happy Daze :D

Hugs'n'snogs,
Julie xx

Monday 6 February 2012

This is love By Paula Tidman


The current Happydaze challenge is Love - A technique you love to use so I thought I would make my better half a Valentine card, using one of my favourite techniques which is stamping in bleach.

I started with  My Minds Eye Union Square, Beautiful Day paper, then I used some white card and covered it with barn door distress ink, rubbing the pad straight on the paper as I find it takes ages buffing with a foam pad on a large area. Then I folded a sheet of kitchen roll into a square and put it on a plate with a small amount of bleach to act as a stamp pad. I stamped a script stamp randomly across the paper, which removes the distress ink and creates a contrasting effect. I used the heat tool to dry, then I buffed some more distress ink to tone it down  a touch as it was a little to bright. I stamped Lost Coast Designs Cupid stamp in archival ink on top and die cut, Then buffed a some black soot DI around the edges and finished with a gold pen. I used Catslife press this is love stamp for the sentiment.


So please join in the Happy Daze challenge and show us the technique you love to use. One lucky winner will be drawn at random to win a  £15 voucher and free P&P to spend in the Happy Daze shop. Maximum of 3 entries per person & you must use at least one product which can be purchased in the Happy Daze shop.
  • You can enter by blogging you address to the linky widget here
  • emailing your picture to info@happy-daze.net
  • uploading your photo to their facebook page


Sunday 5 February 2012

a sneaky valentine by Joanne Wardle


So you have a crush on the guy you sit next to, and you want to send a little valentine, but you want it to be a little different: how about sneaking this little note into the book he is reading?

The theme this month at Happy Daze is "a technique you love". I love to mask. I get through so many many post-it notes, that I have to buy them in bulk. This technique is so easy. just fold your post-it not in half and cut out half a heart. Attach to the card and ink with worn lipstick distress ink. Add a little interest with a background stamp. I used the marble background from Scrolls Work Stamps

Friday 3 February 2012

Light Flyer by Samantha Read

Sorry but this post has been removed as, very excitingly,  the proejct is being published. Look for it in a Craft Stamper this Spring

Moira

Thursday 2 February 2012

Drum roll please: Time to announce the winner of the January Theme.

Twenty entries this month. So I put them all into the random number org and out came number 13. Congratulations to Maggie H who entered a fantastic chunky ATC.
On this she had used Inka Gold and the cover stamp from the February issue of craft Stamper. The new issue of this is available in the shop
Maggie if you would like to email Moira at  sales@happy-daze.net she will arrange for your voucher to be sent to you.
Wednesday 1 February 2012

February challenge: Love - A Technique you love to use

Time to announce the new theme for the month of February. In keeping with the month the theme is LOVE - A Technique you love to use.
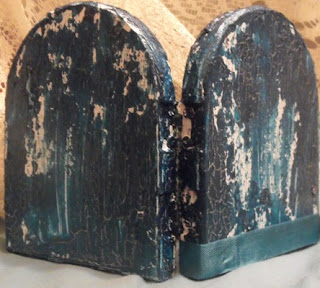
To start your mojo off in style this month Netty ( Annette Goatley) has created this stunning frame and picture using the lovely moon girl from Stampotique.

Netty say's about her project.

I love so many techniques and love creating altered art. But one of my favourite things to do is upcycling. This old wooden frame has been upcylced from an old project.

Products used on the frame : Black Gesso, Crackle Accents, Texture Paste, Turquoise Metallic rub, Stream Adirondack Alcohol Ink and Copper Inka Gold.

Products used for the Picture: - Scrap of embossed card which was swiped with black stazon, stampotiques 'moon girl' and  turquiose stickles. the rest of the embellishments have been upcycled from previous projects.

So share your most loved technique with us here on the blog. As usual there is a £15.00 gift voucher plus free P & P to spend in the Happy Daze Shop which will be award by a random number generator to one lucky entrant and the winner announced on the 2nd of March.
You can enter up to three projects for the challenge and each item must contain at least one item that is available from the shop.
you can enter either via the linky widget below, by uploading your project to the facebook page, or by emailing it directly to me at waynemonster@gmail.com