Showing posts with label Julie Dandy. Show all posts

Sunday, 5 May 2013

Forget me not....by Julie Dandy


As soon as I saw the Graphic 45 Secret Garden I had to have it...I'm sure it was made just for me LOL

I decided to finally use the giant peg I got from Happy Daze, which I had already sprayed purple with cosmic shimmer agggggeesssss ago - it was a failed Halloween project (never throw anything away!!!)


So to start with I covered the front panels with my paper, sanded and inked the edges lightly and added lace, buttons, seam binding ribbon and distress stickles in Victorian Velvet.All the pieces were glued down with Claudine's Matte Medium.

The frame is some chipboard shapes I already had and matched the panels in the G45 paper perfectly (which was a happy accident rather than planned LOL)
I used Inka gold on all the edges then covered with the paper, sanded and lightly inked with Frayed Burlap.


I decided to make a little blackboard on one side of the frame with some self adhesive black board material I had picked up in The Works ages ago, so stuck it on a piece of plain chipboard.


I covered the other side in the patterned paper with a little bit of layering and tearing to age it, then cut out the panel from the paper pad and glued on.

I added my Forget me not message with Tiny type clear stickers and  highlighted with blobs of glossy accents.


I added some lace to the reverse of one of my frames around the edge then  glued the sandwich together with glossy accents, which dries quickly and really holds the chipboard nicely - just don't get it on your pp.

I glued on the buttons and Prima flowers but it just didn't look finished, so I made some holes with my trusty pokey tool and embroidered through the sandwiched frame.


 The cross stitch looked pants on the reverse side so I covered a chippy heart and glued over the yucky stitching ;-)


The little dangly is a scrap piece of chippy covered in paper and die cut with a sizzix jewellery die with buttons added on jump rings.

To finish it off I added more distress stickles and rock candy stickles because I just have too add sparkle (it's the inner magpie in me ;-) ).


So now I have a cute little memo Blackboard that I can write my important messages on, that looks really pretty just sat on my desk :D


Hugs'n'snogs, Julie xx


Friday, 24 August 2012

Love, all the days jar.... by Julie Dandy

The Happy Daze current monthly challenge is, inspired by the Olympic rings, so I thought I would alter a cute round glass jar I picked up in Matalan for just £2!!

I used this amazing Paperbag Studios stamp on to kraft cardstock with black archival ink.
The sentiment reads "May you love... all the days of your life" - I stamped the first part on to a scrap of Tilda fabric, then glued it over the stamped image and highlighted with a TH fragment.
I used Picket Fence distress stain and distress marker to grunge it up a little and highlight areas, then added distress stickles and glossy accents to highlight the words.

The lace was stained with a spritz of distress reinker in a mister with water and the TH foliage was coloured with TH distress embossing powders.and I added a small piece of tissue tape coloured with distress stain.
The lid of the jar was coloured with Viva decor Inka gold, alchol inks in willow, pink sherbert and snowcap mixative, then splodged with distress stickles, I then added some fabric, buttons and a Philosophy tag.
I then added some lace and an TH adage ticket to the base in a memo pin.


The lace around the top was also coloured with the distress reinker and distress stickled.
I added some fabric and buttons in to the bottom of the jar, glue a piece of lace to the back of the jar, then added the stamped image.

Pretty cute huh :D
Hugs'n'snogs,
Julie xx     
Friday, 10 August 2012

Dream a little dream.... by Julie Dandy

I have been thinking about this project for a while and it is still ongoing , so keep watching this space :D

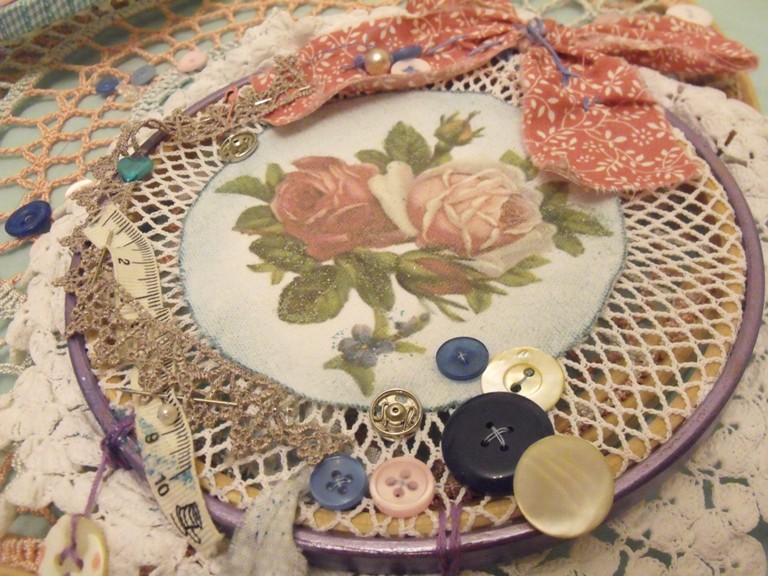
I am using vintage doileys and embroidery hoops to create a pretty, shabby chic, vintage style dream catcher to hang over my bed.

The largest frame is 12" and has a doiley stretched over it and buttons sewn on.
The embroidered one is made from tilda fabrics, which are soooooo lush!!! I taped the fabric on to copy paper with masking tape then put it through my printer, then backstiched over the printed words :D

My project section for Happy Daze uses a vintage doiley that had a fabric circle in the centre which had a little hole in. It was pretty before, but I love it now :D
I coloured the frame with Inka gold, then stretched the doiley over the frame.
I used Claudines matte medium to stiffen the outer edge.

 I found this gorgeous rose image on the internet and printed it on to Claudines sticky backed canvas. I cut it out, scruffed up the edges with my TH distresser,  inked around the edges with broken china distress ink and added some distress stickles.
I used buttons, press studs,ribbon, lace and  pins to embellish the main part of the frame.

The crystal dangles were edged with inka gold after sticking a section of a vintage sewing pattern to the back with the multi medium.
My other dangles were made with wooden spools spritzed with TH distress re-inker in a mini mister, wrapped in ribbon and fabric scraps, along with buttons and feathers.
I will share more pics when the whole project is complete, but here are a few close ups to keep you going :D


 Hugs'n'snogs,
Julie xx

Friday, 29 June 2012

Frozen Dragonfly by Julie Dandy


Well there isn't long left to enter the June Happy Daze challenge so if you want to be in with a chance of winning a £15 gift voucher upload your JUNE BUGS HERE!!!

I decided to try a little bit of assemblage for this cutie dragonfly piece featuring THESE fab wooden spools and the large TH FRACTURED DOLL which is a repro frozen charlotte doll, which is why I called this piece frozen dragonfly :D

I started by selecting graduating sized buttons in various vintage colours (big -or bug surprise LOL!!!), a few beads and some art wire.

I cut a long piece of wire and folded it in half then threaded on my beads, buttons and spools giving the wire an occasional twist to make the shape more flexible.

The ends of the wire made the anttenea by twisting around a pokey tool and adding beads to the ends.

I made the wings by threading the art wire through a cheap lace doiley I bought on ebay, in wing shapes then cutting roughly around the outer edge.
I left enough spare wire to wrap around the main spool so that the wings were secure.
I then wrapped more wire round the fractured doll and added ribbon and lace to the spools.

I coloured the wings by dabbing on versamark ink randomly then used  FRANTAGE embossing powders over the top of it, then heated it gently as the doiley was made of nylon and I didn't want to burn it.

I added a few embellies including more buttons and some ideaology and to finish off , spritzed the whole piece with a spray made from distress re-inker in victorian velvet, then added a splodge or two of distress stickles in bundled sage.

 Here's a few more piccies :D


This is going to look so pretty in my bedroom :D

Hugs'n'snogs,
Julie xx

Saturday, 9 June 2012

The Girl with a Pearl..... by Julie Dandy

As soon as I saw this stamp set I had to have it!!!
I love the painting by Vermeer.

I started by colouring the wooden box with distress stain in broken china, when dry I painted on Picket fence crackle paint.

I stamped  my image on to tissue paper with coffee archival ink and adhered it to the box with a glue stick

I tinted the image with distress markers scribbled on to my craft mat, spritzed, then painted on with a brush to give a nice soft colour. 

I glued on some scraps of lace with glossy accents. then inked the bottom right corner with versamark ink to create a sticky surface for my frantage embossing powders.
They are designed to be heated from below so you need to start with a thin layer and add more while its still hot to build up the layers on a 3d item like this.

If you aren't happy with the areas covered with the embossing powder, brush off before heating.
Because I used a small inkpad I found I had a lot of harsh lines, so softened them this way.

I worked my way around the sides of the box and highlighted areas on the top of the box with the gold powder - I love the way it beads when you heat it slightly or on areas like the lace - you could brush away the extra powder to have a more beaded effect.

To finish off I added distress stickles and added a philosophy tag  embellished with seam binding coloured with the left over distress marker spritzed stain from earlier.

Here's a few more pics for you....


Hugs'n'snogs,
Julie xx

Friday, 11 May 2012

Crafty sew'n'sew by Julie dandy

I have had this idea in my head for a while and finally got around to putting it in to reality :D
I started with one of these fab hardboard collage frames and a papier mache torso.

I cut the torso in half and glued it on to the frame with glossy accents, then gave it a few coats of white gesso as a base.

When completely dry I covered the whole thing with pieces of a vintage sewing pattern glued down with Claudines matte medium.

When dry I painted it with a wash of Claudines studio paints in painterly pink and  sky blue mixed with traditional tan to give it a more vintage look.

I love that it has tinted the paper but you can still see the original print :D

I stamped around the edge in archival ink with these amazing BLOCKHEADS stamps

To finish I added buttons and other sewing ephemera and distress stickles.

If you haven't already go and check out all the NEW ITEMS in the shop as Moira has added some lush new lines that will defo have you parting with your pennies :D

Hugs'n'snogs,
Julie xx

Saturday, 7 April 2012

A Shore thing.... by Julie Dandy


Moira has just got these fabby frames in this week and I <3 them :D

I altered mine with TH distress stains and crackle paint and a bit of bling with distress stickles.


The images are Artistic Outpost Beyond the Sea which were perfect for this months water themed challenge :D

The images were stamped on to Claudine hellmuths sticky backed canvas with archival ink and coloured with distress inkpads.
The TH muse token was coloured with stream and snow cap alcohol ink to give a patina effect.
 Hugs'n'snogs,
Julie xx


Friday, 23 March 2012

"Sing" chunky ATC by Julie Dandy

Link
This is my first attempt at a chunky ATC so I hope you like it LOL

I used Artistic Outpoost Serenity stamp set as this months Happy Daze challenge is Music themed items.

I started by colouring the short sides with distress stain and then glued on some lace with multi matte medium.
When dry I added some distress stickles to the lace to give a more vintage aged feel to it.

I drilled tiny holes in the bottom and glued on my feet - I used beads and bead caps on a head pin.

I coloured my Pink Paislee chipboard letters with distress stain and glued them on to a piece of acetate.
When dry I cut the acetate around the letters and added a long piece with DST to make a dangler - no idea what the techy term is sorry LOL :D
I glued it on to the back of my block which was then covered with patterned paper.

I stamped my Artistic Outpost image with coffee archival ink on to a piece of Tim Holtz patterned paper, distressed the edges and glued on to the front of my block.

I coloured my ribbon with the distress stain so that it matched my piece and tied around the edge of the block.

I then bent a metal filigree corner to the shape of my block and glued it down with the matte medium.

I have a feeling these fabby chunky ATC's may become an addiction LOL :D

Hugs'n'snogs,
Julie xx

Thursday, 1 March 2012

March Challenge - March To Your Own Tune


This month give your items a musical theme, use anything musical on your piece for this challenge. Just remember that at least one item you use must be available from the shop.
This Month Julie has given us inspiration with her fantasitc Altered Shoes.
Julie used the Artistic Outpost set of stamps Songbirds and has this to say about her project.
I decided to treat my old scuffed dancing shoes to a vintage makeover instead of sending them to the bin.
This is how they started out - Poor things.
I started by randomly covering sections with  musical TH Tissue Tape. I trimmed away any excess and tucked some pieces over the edge.

Once I was happy with how it looked I gave them a few coats of Claudine's Multi Matte Medium making sure that all the edges were sealed and smoothed down.
The really fab thing is once it's dry the tape is now waterproof.
I glued on lace trim and then smeared on distress stickles in faded denim - I love doing this as any unwated gluey bits are hidden as well as adding a pretty shimmer and a touch of colour.
Next I made my little frames from Pardo clay using my own mould. Once baked it was a little darker that I wanted so I coloured them with Heirloom Gold Perfect Pearls.
I stamped my images onto white tissue paper that I had coloured with watered down distress ink and glued it onto Claudines Canvas. I did the same thing again with the same image bit this time glueing it down upside down so I had a matching pair.  I used the multi medium to glue them onto the canvas, burnishing it down really well so the canvas texture showed. I then stuck these onto grungepaper, cut them out and glued them into my frames. I attached these to my shoes with jump rings. ( I made holes in my shoes with a cropadile)
I added gems and ribbon to finish them off.
I love these, they really suit my vintage style and if I scuff them I can just add more tissue tape.

Share your musical make with us here on the blog this month. As usual there is a £15.00 gift voucher pluss free P & P to spend in the Happy Daze shop which will be awarded by a random number generator to one lucky entrant and the winner will be anounced on the 2nd of April.

You can enter up to three projects for the challenge and each item must contain at least one item that is available from the shop.
You can enter either via the linky widget below, by uploading your project to the facebook page or by emailing it directly to me a waynemonster@gmail.com


Monday, 27 February 2012

Feb 2012 Tim-esque tag... by Julie Dandy

Well you probably  all already know this news but T!m has sadly decided to retire his Twelve Tags of Christmas with very good reason after listening to retailer feedback at CHA last month.
The good news is he has decided to make a monthly tag sharing techniques and tips :D

He launched the first of his tags at the beginning February HERE with the gorgeous Love themed tag below.

Unfortunately I didn't have any of the products T!m used, not even close LOL, so had to make some major improvisations with my tag as you will see LOL. 

To start with I didn't have an embossing folder with a matching stamp so had to think of a way I could add colour to my raised image - I could have just swiped over the embossed image with an inkpad but I wanted to try something different.

I decided to try out my new distress markers, so coloured in the debossed images on the folder, placed my tag in, huffed on it to refresh the ink (that seems to be the technical term LOL) and ran it through my big shot.
Voila - once nicely inked raised image :D 
In hindsight I wish I had inked my tag first as when I went in with my blending tool the embossed areas picked up a lot of the colour - lesson learned ;-)

As I was going for a sewing theme I diecut a piece of chipboard with the mannequin die and coloured the base and top with my frayed burlap ink pad, then added the same colour distress stickles.

I cut the body section from some of Claudine Hellmuths sticky backed canvas and this time coloured it with my Victorian velvet ink pad (see, I did learn my lesson LOL).
I then followed the same embossing folder technique using the Victorian velvet pen, the attached it to the chipboard base. I added some little stitch details with the fine end of my frayed burlap pen., then stuck it to my tag with glossy accents. 

I decided for the lace die cutting to use a piece of glassine paper which I inked once crumpled with broken china distress stain, then attached with staples.


I didn't have any appropriate stickers for the tag so I cut the words from the Kraft 12x12 resist paper, inked it with my distress stain, then added  faux stitching with my picket fence pen.

I was going to colour my ribbon with  distress stain but didn't really want such a strong colour, so I scribbled on my craft mat with my marker pen, spritzed with water and ran it through the ink, giving it a much softer colour.

I didn't have any charms that worked quite right with my tag so I used my old faithful buttons but it didn't seem enough. 
I improvised again and die cut the little cotton reels from clear shrink plastic which I coloured with Snow cap mixative and ginger alcohol ink before shrinking, then wrapped them with thread.
I think they look really sweet :D

Are you all joining in??
I will be trying every month and will be linking it via Mr.linky on T!ms blog for the competition :D

And for those of you wanting to try the distress markers Moira has them on order so should be here soon  ;-)

Have fun,
Hugs'n'snogs,
Julie xx

Friday, 24 February 2012

Sunshine Smile canvas by Julie Dandy

I have had my eye on THIS gorgeous Paperbag Studios stamp for some time and when I was browsing them AGAIN this project jumped in to my mind :D

This months theme on the Happy Daze blog challenge is a little twist on the usual valentines LOVE theme and is techniques you love to use.

I decided to show you my fave technique with one of my fave products Viva Decor Croco which I kind of invented (well I think I did anyway LOL)

I started by by stamping the image in black archival ink on to a piece of white tissue paper and ripped out the image so it had a nice random torn edge. I glued it in place on my canvas with Claudines matte medium.
I painted on some detail to the image with a little bit of wild honey distress stain.

I made myself a shimmer mist by mixing Wild Honey distress reinker and Perfect Pearls in Sunflower Sparkles in a mini mister and spritzed it over a Prima mask
I coloured these lovely Pink Paislee chipboard alphas, which have a fabby resist pattern on them, with Wild Honey distress stain and glued to the top of the canvas with the matte medium.

I tied a piece of white ribbon along the botom edge and knotted it.

I die cut my flowers from chipboard using Tims tattered floral die and coated them with the platinum croco.
When dry I dotted on alcohol inks in shades of yellow and left to dry again, this is important as we want the alcohol to evaporate before we heat them ;-)
When completely dry and alcohol free I squished them on to a versamark inkpad and made sure they were nice and sticky, then sprinkled on UTEE.
The daisy one is coated with pearl (which was a happy accident LOL) for one coat and then clear was sprinkled in while still hot and heated again - it gave it a nice mottled effect.
The other flowers were coated with three layers of clear with a little bit of glitter sprinkled in.

When cool I glued them on to the canvas and added buttons for the centres, then added three little buttons under the word Smile.

To finished it off I added distress stickles randomly in scattered straw to add a lovely subtle sparkle.
I think she is so pretty and definitely makes me want to smile :D
If you would like more inspiration and a tute on my Croco faux dichroic technique please visit THIS BLOG POST.

Hugs'n'smiley snogs :D
Julie xx