Showing posts with label altered items. Show all posts

Saturday, 25 May 2013

Buzzin Bees By Carol Fox


I have used my favourite Bee stamp again on a box.

I used

Stampotique Stamps : Bee
                                   Hexagon 
Bee's coloured with stickles and alcohol inks
stamped in black archival ink
box painted with acrylic paints

The word "dream" is also by Stampotique but it unfortunately is not one that Happy Daze stocks.

Monday, 4 February 2013

Time of our lives

I've altered a beer mat (a new one :-D that found it's way into my bag when I took the girls for lunch one day)
On it I've used a PBS stamp from the JOY sheet of stamps  I coloured the stamped image with watercolour pencils. I added some party hats from Lost Coast Stamps.
The background of the hanging is made from an old book page that I inked up using colour wash sprays and a mask
Stamped a couple of flourishes and added some words.
Lastly I edged with chalk inks and added some or rather lots of .... glitter!


All my stamped are stamped with Black Archival
Thanks for looking
Mandy x
mandysmagicalworldofart.blogspot.com

Monday, 14 January 2013

Here's the story....

This month our challenge is 'recycled' ~ not my most fave theme I must admit... until I got ill and bought a box of tissues! lol I knew as soon as I saw the pull off top of these that it would be ideal for altering. 

 it's an altered ATC pocket. Just the right size for an atc after sealing up with some staples
 ATC and pocket :-)
 and finally.... the ATC (which is also made using a cereal box as the base
I've used 
white pen

If you'd like to join in with our challenge... check out the deets here 

TFL
Mandy x
mandysmagicalworldofart.blogspot.com

Monday, 5 November 2012

Once Upon A Time

Here is an altered book that I've made this week, using a (very) cheap notebook from a supermarket (think it cost me 18p) and then some acrylics on paper ~ using a scraping method with an old phone card.

I've used a zetti stamp ~ you can find a huge selection here. All stamping is done with Ranger Archival Ink in jet black.

This month's challenge is BRIGHTEN UP THE MONTH ~ check out the details here to find out how you can win a voucher for the Happy Daze online shop.

TFL
Mandy x

Saturday, 9 June 2012

The Girl with a Pearl..... by Julie Dandy

As soon as I saw this stamp set I had to have it!!!
I love the painting by Vermeer.

I started by colouring the wooden box with distress stain in broken china, when dry I painted on Picket fence crackle paint.

I stamped  my image on to tissue paper with coffee archival ink and adhered it to the box with a glue stick

I tinted the image with distress markers scribbled on to my craft mat, spritzed, then painted on with a brush to give a nice soft colour. 

I glued on some scraps of lace with glossy accents. then inked the bottom right corner with versamark ink to create a sticky surface for my frantage embossing powders.
They are designed to be heated from below so you need to start with a thin layer and add more while its still hot to build up the layers on a 3d item like this.

If you aren't happy with the areas covered with the embossing powder, brush off before heating.
Because I used a small inkpad I found I had a lot of harsh lines, so softened them this way.

I worked my way around the sides of the box and highlighted areas on the top of the box with the gold powder - I love the way it beads when you heat it slightly or on areas like the lace - you could brush away the extra powder to have a more beaded effect.

To finish off I added distress stickles and added a philosophy tag  embellished with seam binding coloured with the left over distress marker spritzed stain from earlier.

Here's a few more pics for you....


Hugs'n'snogs,
Julie xx

Friday, 11 May 2012

Crafty sew'n'sew by Julie dandy

I have had this idea in my head for a while and finally got around to putting it in to reality :D
I started with one of these fab hardboard collage frames and a papier mache torso.

I cut the torso in half and glued it on to the frame with glossy accents, then gave it a few coats of white gesso as a base.

When completely dry I covered the whole thing with pieces of a vintage sewing pattern glued down with Claudines matte medium.

When dry I painted it with a wash of Claudines studio paints in painterly pink and  sky blue mixed with traditional tan to give it a more vintage look.

I love that it has tinted the paper but you can still see the original print :D

I stamped around the edge in archival ink with these amazing BLOCKHEADS stamps

To finish I added buttons and other sewing ephemera and distress stickles.

If you haven't already go and check out all the NEW ITEMS in the shop as Moira has added some lush new lines that will defo have you parting with your pennies :D

Hugs'n'snogs,
Julie xx

Saturday, 7 April 2012

A Shore thing.... by Julie Dandy


Moira has just got these fabby frames in this week and I <3 them :D

I altered mine with TH distress stains and crackle paint and a bit of bling with distress stickles.


The images are Artistic Outpost Beyond the Sea which were perfect for this months water themed challenge :D

The images were stamped on to Claudine hellmuths sticky backed canvas with archival ink and coloured with distress inkpads.
The TH muse token was coloured with stream and snow cap alcohol ink to give a patina effect.
 Hugs'n'snogs,
Julie xx


Friday, 23 March 2012

"Sing" chunky ATC by Julie Dandy

Link
This is my first attempt at a chunky ATC so I hope you like it LOL

I used Artistic Outpoost Serenity stamp set as this months Happy Daze challenge is Music themed items.

I started by colouring the short sides with distress stain and then glued on some lace with multi matte medium.
When dry I added some distress stickles to the lace to give a more vintage aged feel to it.

I drilled tiny holes in the bottom and glued on my feet - I used beads and bead caps on a head pin.

I coloured my Pink Paislee chipboard letters with distress stain and glued them on to a piece of acetate.
When dry I cut the acetate around the letters and added a long piece with DST to make a dangler - no idea what the techy term is sorry LOL :D
I glued it on to the back of my block which was then covered with patterned paper.

I stamped my Artistic Outpost image with coffee archival ink on to a piece of Tim Holtz patterned paper, distressed the edges and glued on to the front of my block.

I coloured my ribbon with the distress stain so that it matched my piece and tied around the edge of the block.

I then bent a metal filigree corner to the shape of my block and glued it down with the matte medium.

I have a feeling these fabby chunky ATC's may become an addiction LOL :D

Hugs'n'snogs,
Julie xx

Friday, 24 February 2012

Sunshine Smile canvas by Julie Dandy

I have had my eye on THIS gorgeous Paperbag Studios stamp for some time and when I was browsing them AGAIN this project jumped in to my mind :D

This months theme on the Happy Daze blog challenge is a little twist on the usual valentines LOVE theme and is techniques you love to use.

I decided to show you my fave technique with one of my fave products Viva Decor Croco which I kind of invented (well I think I did anyway LOL)

I started by by stamping the image in black archival ink on to a piece of white tissue paper and ripped out the image so it had a nice random torn edge. I glued it in place on my canvas with Claudines matte medium.
I painted on some detail to the image with a little bit of wild honey distress stain.

I made myself a shimmer mist by mixing Wild Honey distress reinker and Perfect Pearls in Sunflower Sparkles in a mini mister and spritzed it over a Prima mask
I coloured these lovely Pink Paislee chipboard alphas, which have a fabby resist pattern on them, with Wild Honey distress stain and glued to the top of the canvas with the matte medium.

I tied a piece of white ribbon along the botom edge and knotted it.

I die cut my flowers from chipboard using Tims tattered floral die and coated them with the platinum croco.
When dry I dotted on alcohol inks in shades of yellow and left to dry again, this is important as we want the alcohol to evaporate before we heat them ;-)
When completely dry and alcohol free I squished them on to a versamark inkpad and made sure they were nice and sticky, then sprinkled on UTEE.
The daisy one is coated with pearl (which was a happy accident LOL) for one coat and then clear was sprinkled in while still hot and heated again - it gave it a nice mottled effect.
The other flowers were coated with three layers of clear with a little bit of glitter sprinkled in.

When cool I glued them on to the canvas and added buttons for the centres, then added three little buttons under the word Smile.

To finished it off I added distress stickles randomly in scattered straw to add a lovely subtle sparkle.
I think she is so pretty and definitely makes me want to smile :D
If you would like more inspiration and a tute on my Croco faux dichroic technique please visit THIS BLOG POST.

Hugs'n'smiley snogs :D
Julie xx

Thursday, 12 January 2012

A new way to make an old book cover by Ruth

My love affair with everything Art Deco has never faltered since my teens so you imagine my joy when these gorgeous papers arrived. I had plans for one page but when you purchase a Websters pack you always get two, so today I have used both papers on different projects. 

As the theme of this months challenge is "try something new".....I have used my "NEW" sewing machine and made a fabric book cover. I was inspired by the cover of a new craft magazine on the market...but in my haste I forgot to add the handles...duh!!


I used cotton calico and cut the material to fit the opened book with a generous 4cm selvedge. The second piece is the same size as the first but cut in half and turned in to neaten the inside edges. Pin to the outside edges and stitch along all the raw sides. Turn inside out to create the flaps and sew down/neaten the edge of the top and bottom that show on the spine.


Spray with pastel colour sprays.....oh such fun!!

I added (stitched) a luxurious silver trim to the spine Embroidered Lace it's 7cm wide and so stunning that I have been hanging onto it for too long!!


Leave to dry and slip the book inside and decorate with Websters Pages Hollywood Vogue paper. and Fabric Ribbon.


I love how versatile the calico is and so much quicker to make and spray than using paper and creating envelope corners and waiting for glue to dry.

(I think I am going to leave the fancy cover behind and just take my sketch book to New Zealand then add photos on my return and pop the cover back on it).

Tip: You can cover recipe books, vintage books, diaries, sketch books etc to make lovely gifts.

Websters 12x12 number 2!

This layout is my sister wearing a necklace as a flapper headpiece.....the whole family get dressed up 1920's style once a year along with about six thousand locals and tourists.


I cut the patterned paper using a template and glued it onto the black 12x12. The edges are dotted with liquid pearls to represent flapper necklaces. A doiley, stickers, wooden Kaisercraft fence, some journelling notes and ephemera complete the page. 


This year it's my turn to dress up..camera check, diary check, flapper dress check!!

A quick reminder about the current Happy Daze Challenge which is Try Something New for the New Year.
 It could be a new technique you have recently discovered or some new stash you can't wait to to use. There is still plenty of time to enter. One lucky winner will be drawn at random to win a  £15 voucher and free P&P to spend in the Happy Daze shop.
 Maximum of 3 entries per person & you must use at least one product which can be purchased in the Happy Daze shop. 
  • You can enter by blogging your address to the linky widget here, 
  • emailing your picture to info@happy-daze.net
  • uploading your photo to their facebook page


Friday, 9 December 2011

Santa stop here...... by Julie Dandy

This week I was inspired by T!ms 12 days of Christmas day 4 tag but made it in to a Santa stop here door hanger.

I started by covering my wooden door hanger with Pink Paislee Santas list patterned paper.
I inked it with and then splattered and spritzed on water to give a nice mottled grungey look.

I used Viva decor Inka Gold on the wooden edges which I found easiest to apply with a semi dry baby wipe.

Th ruffle on the bottom is made with pleated tissue tape - I put a piece of double sided tape on to the base first then pleated the tape along it.

My lace was coloured by putting distress stain on to my nonstick craft sheet, adding a little water to soften the colour and squishing the lace in to it until I was happy with the coverage.
I glued it down with Claudine's matte medium.

I ran a piece of acetate through my big shot with the TH snowflake border embossing folder and cut around the snowflakes.
I attached this with a little DST along the edge that would be hidden by my embellishments.

My snowman and snowflakes were cut from grunge board then painted with pearl acrylic paint dabber.
I coated the snowman with Rock Candy crackle glaze and left it to dry thoroughly , when dry I highlighted the cracks with distress inks.
I added the snowflakes with glossy accents and added buttons to the centres.
I tied some scraps of ribbon and fabric round his neck for a scarf and dangled some buttons strung together with jump rings from it, then attached him to the hanger with foam tape to add some dimension.

My little sign was hand written on to the back of an journalling ticket and pinned on with a memo pin

The last thing I did was smear on lashings of Rock Candy distress stickles to give it a lovely sparkly frosty feel.

Have fun,
hugs'n'snogs,
Julie xx

Friday, 25 November 2011

Santas Christmas treat chest.... by Julie Dandy


Well I really need to kick start my Christmas mojo in to gear as I am so disorganised with only being back from my hols less than two weeks!!
I thought I would share this cute idea for an alternative advent calendar which could be decorated to suit all ages.

I have made mine in to a vintage shabby chic style and plan on filling it with little chocolate treats, candy canes and promise tickets - eg. make mince pies, watch a Christmas movie etc...

I used a papier mache chest and covered it with two sheets of Pink Paislee Santas list 12x12 paper.

I started by painting all the edges inside and out with green acrylic paint so that any expose areas wouldn't be left brown.
When dry I painted the edge that is trimmed with red acrylic paint and left to dry again.

I cut the papers roughly to size and then used my nail to give score the paper in to the edges of the box to give me a cutting guide. The boxes aren't exact measurement wise, so make sure your paper is cut to fit the widest points so that you can cut them back to size.I distressed my edges with an emery board and then inked with Broken China distress ink pad then glued them in to place with Glossy Accents - I like to swirl it on then spread it out with my finger so that it reaches all the edges. I like GA for sticking paper on to objects as it grabs and dries quickly.

On the inside of the lid I added a distressed hole in the paper before adhering to the box and stuck a small piece of contrasting patterned paper on to the back to add to the shabby look.

I covered it inside and out and when finished strengthened the hinged section with tissue tape which I also inked with the broken china.

I glued on a piece of vintage lace using Claudine's matte medium - now I have a little tip when using this - make sure you clean the edge of the jar before you put the lid back on. If you don't (like I hadn't) and then don't use it for a while you will have BIG problems getting the lid off!

I also used the medium to stick the charms and prima flower on, as already mentioned its a really good strong glue LOL :D

I embossed some of the pieces with TH alterations embossing folders which I distressed and inked.

My splash of colour on the project is my lovely broken china distress stickles and the distress stain I used on the Adage ticket.

I used some letter stickers I have had for ages on the front of the box and gave them a little bit of dimension with the Glossy Accents. The promise tickets would be a great idea to keep the kids occupied over the Christmas period with ideas like make paper chains, make gingerbread, write a letter to Santa etc...

If you were making it for a crafter you could make little parcels or envelopes and fill them with little embellies - ideaology trinkets would be fabby for anybody taking part in T!ms 12 tags of Christmas. Moira sells fabby taster packs of these too so it needn't cost a fortune.

Or how about filling it with chocolate coins?

If you get cracking you will just have time to make it before the 1st of December :D

Hugs'n'snogs,
Julie xx

Wednesday, 23 November 2011

Vintage Gentleman


Ohhh its Wednesday and my turn to blog I nearly forgot (blushing smiley) Today I have a little altered cheese box to share.
It's been covered with tissue tape(to hide the horrible mess I made of it when I painted it, tissue tape is perfect for this lol) I then spritz it with a mister to age it a little bit and take away the shiny newness of it.
After adding a stamped image I embellished it with Tim Holtz cogs and spinners, a word tag a small pair of binoculars and a key.
A quick easy little make and a perfect man present.

Items I Used.

Tim Holtz Tissue tape
Game spinners
cogs
word tag

K and Co metal kay

Wednesday, 9 November 2011

An Assortment Of Boxes By Carol Fox

I am seriously in love with these little boxes that Moira has in the shop. I have done a few of them this week as I have had four commissions for these little boxes and I have done a couple for an upcoming Victorian Market I am booked for.
So I am sharing some of them as my DT piece today to show how easy it is to get so many different looks with them just by different paint and stamping techniques.

This box I altered using Glimmer mists and Gold leafing and embossing powder and rubber stamping.

On this one I used a basic cream paint crackled over the plain box using PVA glue, when dry I rubbed over it with Victorian Velvet Distress ink, before adding rubber stamping. Finally spritzing it with Glimmer mists.

This one was simply coloured with Distress stains in Wild Honey and Fired Brick, after rubber stamping I smudged Pitch Black Dabber around the edges to age it a bit.

And lastly my favourite. I used the PVA crackle paint technique on this again, rubber stamping a "spell" around the four sides before embossing in gold. Add the large fairy charm under the pocket watch dome on the lid. The handle is the Pocket watch winder and I have added four fairy crowns for feet on the box.

Items I Used
Small wooden boxes
Small Crowns
Cosmic shimmer mists
Paint Dabbers
Paints
fairy charm
Embossing powders

Distress Stains

Finally don't forget the current challenge is an Explosion of Colour, so if you have made something bright and beautiful this month using any product that the shop stocks have a look at the post on the blog to upload your picture.

Friday, 9 September 2011

Dreamy butterfly tin by Julie Dandy


Well, I was already to share a cute altered domino necklace with you this week until I checked the blog and spotted that Moira and Carol had already beaten me to jewellery pieces!!! LOL
But never mind, it spurred me on to finish this sweet little tin instead :D

I covered the lid with Tim Holtz tissue tape in a random pattern to create a collaged effect. I used alcohol inks sponged on to the tape to colour it, then used a fine brush to add colour to the butterfly.
When it was completely dry I gave it a couple of coats of Lisa Pavelka resin - this is the stage that it has sat on my table for for about a month, not the resins fault as it was cured, I just couldn't decide where it was going next!!!

So I set it in front of me last night and stared it out for a while.

Then I had a look in my cupboard, then stared some more!

Then it hit me like a lightening bolt and I reached for my jewellery making boxes and hunted out the perfect metal leaf charms and lush lucite flower beads (I'm not sure what lucite is but they do look like plastic to me haha :D)

I added some pearls, buttons , lace and some teeny alphas and bobs your uncle - one sweet little tin that would be great to give a tiny gift in or just as a gift on its own .

Pop on over to Happy Daze to see most of the products I used on this project.

Hugs'n'snogs,
Julie xx

Friday, 19 August 2011

From Paris with love.... by Julie Dandy


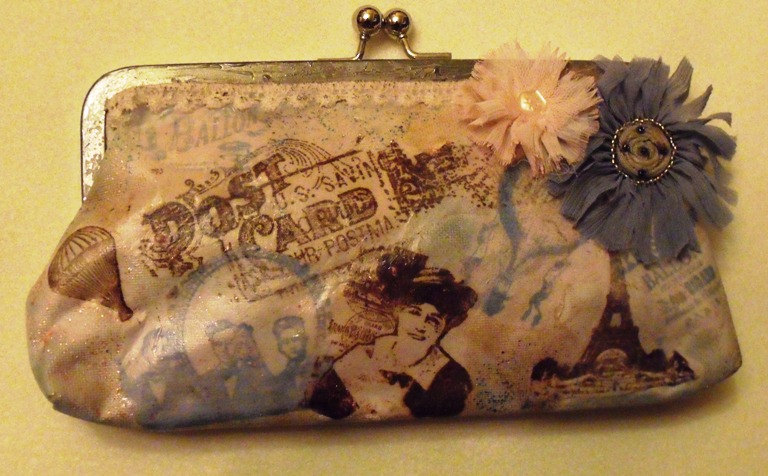
I begged Moira at the trade show in February to buy these cute little bags and it took some convincing let me tell you LOL :D

I have been meaning to do something with it for ages but it has been playing hide and seek with me for a while, but I finally caught it :D

I used Claudine Hellmuth studio paints watered down in a mini mister to colour the bag to start with as it was very white!!

I stamped Artistic Outpost Paris Exposition stamps on to tissue paper with Archival ink and tore around the images before gluing them down with Claudines multi matte medium.

I built up the colour with different colours of the watered down paint drying in between each colour. The amazing thing about these paints is they are waterproof when dry.
I applied some of the archival ink with a sponge to distress the edges a bit then gave it two generous coats of the matte medium.

When dry I added distress stickles randomly with my finger then when dry glued on the lace with the matte medium (its not completely dry in the pic sorry!!!)

I added a Zazi flower and madrigal flower which I only had in white, so I spritzed it with the pink paint :D

I'm really pleased with the finished bag and will definitely be using it :D

Moira has some fab offers on the site at the moment so head on over to grab yours :D

Hugs'n'snogs,
Julie xx

P.S. Woopsie!! I missed off these fabby Glitz stamps!!

Thursday, 11 August 2011

Beside the Seaside - By Carol Fox


The perfect mirror for a little mermaid to use in her underwater kingdom.
The mirror is one of the lovely blanks that are in the shop in two shapes of a heart and an oval.
I crackled a background using a purple and a cream acrylic paint, when this was dry I over inked it with dusty concord distress ink. This already look pretty good, but I wanted a bit of texture to it, so using a mask and Croco Colour in Blackberry I added a pattern detail to it. I also did this all over the back of the mirror and you can see from the photo how lovely the Croco works through a mask.
I went around the sides of the mirror with a thick coat of gold embossing powder.
The jewels around the mirror are from the shop, I do love these and the great thing about them is that they can be coloured with alcohol inks. I had to do this as I had a random colour selection of them, so using Raisin alcohol ink I did them all the colour I wanted.
The little seahorse is made from a mould with utee melted in my heat pot and then given a bit of a rub over with Viva Inka Gold to make it all gold and shimmery.
The theme for the new challenge this month is I Do Like to be beside the seaside and there is the prize of a £15.00 shop voucher plus free P & P up for grabs. So do check out all the details of how to upload your items by having a look HERE. You Gotta be in it to win it.

Friday, 5 August 2011

Beach hut basking by Julie Dandy


The current challenge is "oh I do like to be beside the seaside..." and what do you find beside the seaside??? Colourful beach huts so I decided to get a little bit creative with one of these cute mini birdhouses, Artistic Outpost "Beyond the sea" stamps and some Tim Holtz ideaology :D

I removed the dowel perch and then cut pieces of lightly striped pattern paper, stamped them with coffee archival ink and distressed them with a combo of Frayed Burlap and Fired Brick distress ink pads.

I glued a TH metal corner to the top of the house and the glued the paper in place with a little bit of glossy accents covering the holes, its fabby for glueing paper to this kind of project as it dries quickly.

I made the door by taking a lollipop stick that came with some rub-ons and cut it to the height I wanted with my TH scissors I then cut the three pieces length ways to make it look like old wood.
I coloured them with TH Broken China distress stain and when dry glued them to a smaller piece of paper.
When dry I glued them to the front of the house and coloured the base of the bird house with wild honey distress stain.
I didn't have any sand so I added some distress embossing powders (unmelted) inside my bottle before tying it to the house with garden twine.
To complete the project I added more seaside themed charms and Timmy embellies :D

The houses are so cute and could be used for so much more than just a cute birdhouse - I'm thinking little new home gifts, gingerbread houses, or something cute and Alice themed :D

Here's a few more pics of my ickle beach house :D


If you want to be in with a chance of winning a £15 voucher with free P&P in our August "Oh I do like to be beside the Seaside" challenge you can enter in one of 3 ways:
  • Blog your entry and use the Linky widget in the Blog post HERE
  • Load to the Happy Daze Facebook Page
  • Sent a pic by email to info@happy-daze.net
Closing date is midnight 31 August.

Thanks for looking,
Hugs'n'snogs,
Julie xx