Showing posts with label paperbag studios. Show all posts

Thursday, 27 June 2013

All Paperbag Rubber Stamps 40% off in the Sale


This week I have used a couple of stamps from the Paperbag set of stams Addison.
I coloured my background  using the wrinkle free distress technique, this was done directly onto my tag. I then stamped my image in black archival ink and masked it off.


The alphabet from the sheet was stamped with one of the distress inks used for the background. Then using an old strore card I applied gesso thinly through a stencil. Finishing it off with a black dabber and some lines drawn with a pen.

I used

Paperbag Studio Rubber stamps
Tag
Distress inks
Black dabber
white gesso
stencil

Carol x

Saturday, 9 March 2013

Paperbag Hugs Lavenderbag By Carol Fox


I have been playing with some TAP lately and I have had some small bits and pieces of it left over, so I have used a piece of it to stamp onto using the Paperbag image Hugs.
I coloured my image using spray inks that I squirted onto my craft mat and picked up with a water colour pen.
I made up a small bag the size I wanted and ironed my image onto it.


I have tied it with a long ribbon loop for hanging on the inside of my wardrobe door.

I used

Paperbag Studios Stamp Hugs
Colour wash sprays 

Thanks for visiting today, Carol x

Monday, 4 March 2013

Clean & Simple

hmmmm...... two words that do not spring to mind when describing my 'style' of artwork. However, I challenged myself and believe me it WAS a challenge to do CandS.

I've used

Paperbag studios ~ shoes from the sweet pea collection ~ just checked you can also get the shoes as an individual stamp too

Artistic Outpost ~ oz

TFL
Mandy x
mandysmagicalworldofart.blogspot.com

Monday, 4 February 2013

Time of our lives

I've altered a beer mat (a new one :-D that found it's way into my bag when I took the girls for lunch one day)
On it I've used a PBS stamp from the JOY sheet of stamps  I coloured the stamped image with watercolour pencils. I added some party hats from Lost Coast Stamps.
The background of the hanging is made from an old book page that I inked up using colour wash sprays and a mask
Stamped a couple of flourishes and added some words.
Lastly I edged with chalk inks and added some or rather lots of .... glitter!


All my stamped are stamped with Black Archival
Thanks for looking
Mandy x
mandysmagicalworldofart.blogspot.com

Monday, 28 January 2013

I am Queen

I love the quirky quotes from Catslife Press! This one just jumped out at me for this pair of girls from Paperbag Studios. One had a big bow one her head so the other definitely deserved a crown from the party hats collections (lost coast) I even managed a bit of recycling with an old book page ~ Agatha Christie if you're interested! lol

I used a Krylon pen around the edge.

Yes the image is wonky ;-S ~ I am most perturbed about this but the rest of the card is straight lol

TFL
Mandy x
mandysmagicalworldofart.blogspot.com

Monday, 14 January 2013

Here's the story....

This month our challenge is 'recycled' ~ not my most fave theme I must admit... until I got ill and bought a box of tissues! lol I knew as soon as I saw the pull off top of these that it would be ideal for altering. 

 it's an altered ATC pocket. Just the right size for an atc after sealing up with some staples
 ATC and pocket :-)
 and finally.... the ATC (which is also made using a cereal box as the base
I've used 
white pen

If you'd like to join in with our challenge... check out the deets here 

TFL
Mandy x
mandysmagicalworldofart.blogspot.com

Sunday, 11 November 2012

Grumpy Girl Box...By Carol Fox


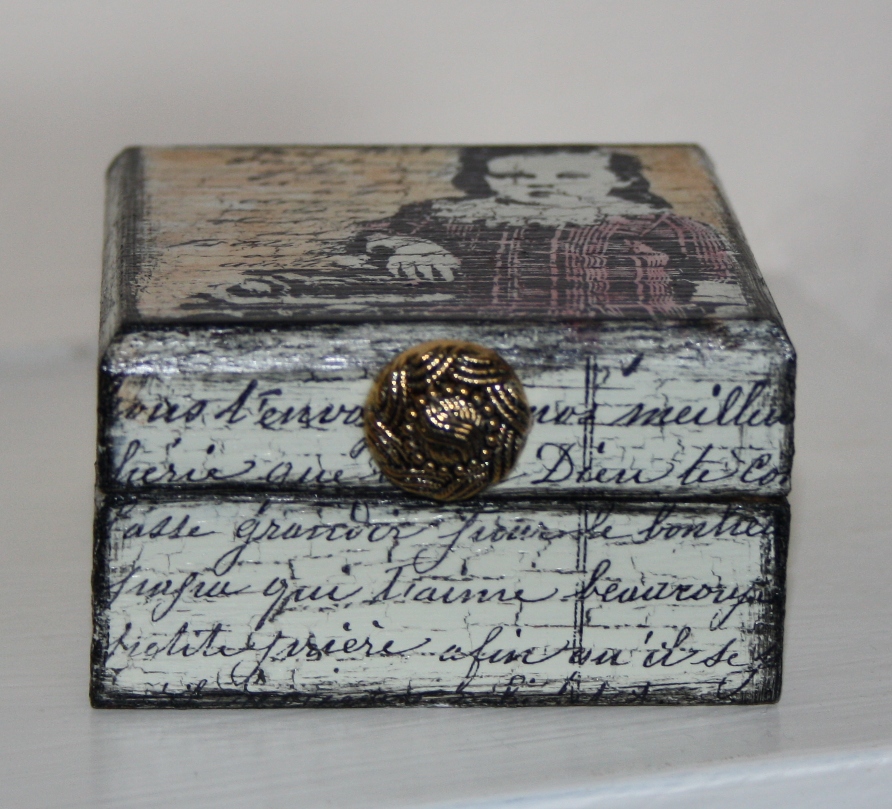
This image by paperbag studios has always been one of my favourites from the Delight sheet, I just love the grumpy look on the girls face.


I have used it on the lid of one of these smaller sized wooden boxes. The text from the same sheet has been used around the edge. The box was painted and then sealed with Glue and Seal before the images were stamped onto the box. It was then gently coloured using alcohol inks, in the pens available in the shop here.

Saturday, 8 September 2012

Body Clock

'Steampunk. Steampunk. Steampunk.', that's what has been going round in my head. 
Steampunk things do not come naturally to me so thank goodness inspiration struck yesterday. When I think of Steampunk I think of cogs and then I think of clocks, so I thought of my body clock and how young my brain is even if the rest of me is starting to stop working, going grey or falling off!
I ended up making this ATC, hope you like it!
I started off with some white card and swooshed some purple and blue colour on with some Derwent Inktense pencils, added the die cut vintage lace at the bottom for some texture and to give my little lady something to stand on. Then applied a thin layer of gesso all over. I then stamped the Daisy and coloured, gesso'd again and stamped the checkerboard and gesso'd again. I stamped Lavendar Sprig, Butterfly, and Flying Girls, coloured and cut. For the body I melted some clear embossing powder and stuck some watch parts in. I then glued everything in place and wrote the sentiment.
Steampunk is the theme for the our challenge this month, here are the details, I hope you can join in with a chance to win £15!
Wishing you a happy day, Sam xxx


Friday, 24 August 2012

Love, all the days jar.... by Julie Dandy

The Happy Daze current monthly challenge is, inspired by the Olympic rings, so I thought I would alter a cute round glass jar I picked up in Matalan for just £2!!

I used this amazing Paperbag Studios stamp on to kraft cardstock with black archival ink.
The sentiment reads "May you love... all the days of your life" - I stamped the first part on to a scrap of Tilda fabric, then glued it over the stamped image and highlighted with a TH fragment.
I used Picket Fence distress stain and distress marker to grunge it up a little and highlight areas, then added distress stickles and glossy accents to highlight the words.

The lace was stained with a spritz of distress reinker in a mister with water and the TH foliage was coloured with TH distress embossing powders.and I added a small piece of tissue tape coloured with distress stain.
The lid of the jar was coloured with Viva decor Inka gold, alchol inks in willow, pink sherbert and snowcap mixative, then splodged with distress stickles, I then added some fabric, buttons and a Philosophy tag.
I then added some lace and an TH adage ticket to the base in a memo pin.


The lace around the top was also coloured with the distress reinker and distress stickled.
I added some fabric and buttons in to the bottom of the jar, glue a piece of lace to the back of the jar, then added the stamped image.

Pretty cute huh :D
Hugs'n'snogs,
Julie xx     

Saturday, 18 August 2012

No longer something fishy

This empty tuna tin was really well washed before being decorated.
I was inspired by the night sky for this creation and just trying to capture a moment in time when all seemed really peaceful.
I began by painting the inside of the tin with Studio Paints, I pva'd some glitter and star sequins for some detail and texture on the back and stamped with white paint a flourish around the outside of the inside. The base for the houses is made of balsa wood, just painted black. The moon, stars and houses are all shrink plastic and coloured with Prismacolor pencils. There are some idea-ology cogs and a light bulb for extra details, and the wire is simply threaded with some pearl beads and suspended between two holes I made with a crop-a-dile. Finally I added two wooden beads so it wouldn't roll around.

Shopping List:
Artistic Outpost, Serenity (for the flourish)

There is still plenty of time to enter this months challenge with a chance to win £15 to spend at Happy Daze, details are here, good luck!

Wishing you a happy day, Sam xxx


Thursday, 12 July 2012

Feeling Chunky

I remember when the chunkiest thing that could be found was a Yorkie bar, now it's the chunky ATC!
For this creation I began by adding texture to the top, bottom and sides using modelling paste through a stencil and letting it dry throughly before painting all surfaces with Claudine Hellmuth Studio Paint. I was a bit of wimp and made the designs on card and then glued them on instead of going direct to the ATC.
For this side I used the tissue paper technique and stamped the frame from the Artistic Outpost set, Home cut off the cockeral etc and glued this down, I then stamped and coloured Lily and Zoe and glued them down also.  
 This side was done in the same way with the Angel In Disguise stamp. 
To get the distressed look on the edges I just applied a little burnt umber oil paint with my finger. At this point I liked it but it just seemed a little flat so I added some beads for feet and some random beads on wire for some dimension.

Here's what I used:

I do hope you like it, wishing you a very happy day, Sam xxx


Monday, 28 May 2012

Beeswax Beauty

I'm finding the new Suzi Blu stamps very hard to resist so for this make I just wanted to show how different the same stamp can look, if you look at my previous post Queen of Hearts you'll see I've used the same stamp but changed it a little. For this make I removed her wings, ouch, and just continued her hair to her waist.
I began by stamping the Angel of Art stamp on ordinary printer paper and then removed her her wings, I stuck the image down and then coloured in her face, neck and hands with pencils as these are the only parts that are not painted. I used string and modelling paste for the texture of her hair. The little bird is made with modelling paste as are the details of the skirt. I used a Prima Songbird stamp for the flowery details around the edge. Finally I stamped the Balloons stamp on tissue paper and then glued down so I would get it in the right place. After painting everything I then used an ordinary pencil to go over the edges and some of the details which gives the whole make a hand drawn look. I covered the whole make with beeswax and then distressed it by scratching with a knife and applying burnt umber oil paint and then rubbing off, a bit of bling adds another dimension simply embedded in the beeswax.
I used some stash and Suzi Blu Angel of Art stamp,

Wishing you a lovely, happy day, Sam xxx

Sunday, 8 April 2012

Celestial Waters by Samantha Read

It's great fun finding different ways to use water particularly with distress inks as they react so well to water.
To make the background for this card I simply covered the card with broken china distress ink and then put a little water on Jo's star stamp, and stamped. I applied the water to stamp with my finger as I discovered too much water on your stamps and the image isn't clear. I found the best way to get a good water stamped image was to press firmly but not for long and then dry promptly with a heat gun before the image got too watered down. It's really worth practising this technique as the effect is never the same twice.
The Lily and Zoe stamp from Paperbag Studios is quickly becoming one of my favourites, so colouring them in contrasting colours and a bit of textured matting and layering brings this card to life. I do so hope you like it.
Wishing you a happy day, Sam xxx

I used: 

Friday, 16 March 2012

' LAUGH' - The Musical by Annette Goatley (Nettyscraftings)

Hi, going with the theme of Music this month I chose to use that fabulous stamp 'Laugh' by Paperbag Studios available at Happy Daze for both my makes, am so loving this happy face.


This card was made with sheet music which has been lightly stained with Antique Linen Distress Ink. Heat embossed the Laugh stamp.  The flower is made up of sheet music, flowers from stash, glitter spot net and filled with micro beads which were alcohol inked with gold.


The wooden box is something I picked up in Portugal, but I found a better one in the Happy Daze shop which is the same ..........darn it  wish I had seen that one earlier. First Gesso was used,  acrylic paint and then rubbed down to age it a bit.  Heat embossed the Laugh stamp .  Lined with patterened paper.  Lacquered to finish it off.

A tip -  give at least 3 - 4 days for the lacquer to properly dry otherwise you won't be able to open the box easily.  Am telling you this because I found out the hard way................won't tell you the words I used over this as they are not for your angelic ears.................lol

Look forward to seeing your creations for this month's theme.  Take care, hugs Annette x

Friday, 24 February 2012

Sunshine Smile canvas by Julie Dandy

I have had my eye on THIS gorgeous Paperbag Studios stamp for some time and when I was browsing them AGAIN this project jumped in to my mind :D

This months theme on the Happy Daze blog challenge is a little twist on the usual valentines LOVE theme and is techniques you love to use.

I decided to show you my fave technique with one of my fave products Viva Decor Croco which I kind of invented (well I think I did anyway LOL)

I started by by stamping the image in black archival ink on to a piece of white tissue paper and ripped out the image so it had a nice random torn edge. I glued it in place on my canvas with Claudines matte medium.
I painted on some detail to the image with a little bit of wild honey distress stain.

I made myself a shimmer mist by mixing Wild Honey distress reinker and Perfect Pearls in Sunflower Sparkles in a mini mister and spritzed it over a Prima mask
I coloured these lovely Pink Paislee chipboard alphas, which have a fabby resist pattern on them, with Wild Honey distress stain and glued to the top of the canvas with the matte medium.

I tied a piece of white ribbon along the botom edge and knotted it.

I die cut my flowers from chipboard using Tims tattered floral die and coated them with the platinum croco.
When dry I dotted on alcohol inks in shades of yellow and left to dry again, this is important as we want the alcohol to evaporate before we heat them ;-)
When completely dry and alcohol free I squished them on to a versamark inkpad and made sure they were nice and sticky, then sprinkled on UTEE.
The daisy one is coated with pearl (which was a happy accident LOL) for one coat and then clear was sprinkled in while still hot and heated again - it gave it a nice mottled effect.
The other flowers were coated with three layers of clear with a little bit of glitter sprinkled in.

When cool I glued them on to the canvas and added buttons for the centres, then added three little buttons under the word Smile.

To finished it off I added distress stickles randomly in scattered straw to add a lovely subtle sparkle.
I think she is so pretty and definitely makes me want to smile :D
If you would like more inspiration and a tute on my Croco faux dichroic technique please visit THIS BLOG POST.

Hugs'n'smiley snogs :D
Julie xx

Friday, 13 January 2012

More Leonardo By Samantha Read

Totally inspired by Paula's fab Mona Lisa creation in Tuesday's post and the constant thinking of Leonardo Da Vinci, here's my design piece for today. It's keeping in with the challenge theme 'Something new for the New Year' because the Mona Lisa stamp is new!
The background Thistle Stamp always makes me think of Leonardos' Vitruvian Man, you know the one, you do! Mona Lisa was stamped on tissue paper and then pva'd to the little canvas which had been painted landscape green.
The thistle then reminded me of a halo and personally I think behind that demure smile Mona Lisa may not have been the angel we think . . . I then added some lace to give the piece a little more dimension and a cheeky flower for the lady! 
I'm also going to share a postcard I created for a swap using Mona Lisa again but also some other Lost Coast Stamps...
... 3 Birds, Border Bingo and Border Tape Measure. Also Long Splatter is there somewhere!  
Thanks for looking, wishing you a lovely day, Sam xxx